How to Change the Center Point in After Effects: Unleash the Power of Positioning
Introduction – Unlocking the Power of Center Point Manipulation in After Effects
Have you ever wondered how motion graphics artists achieve such precise positioning and seamless animation effects in their projects? The secret lies in understanding and mastering the concept of the center point in After Effects.
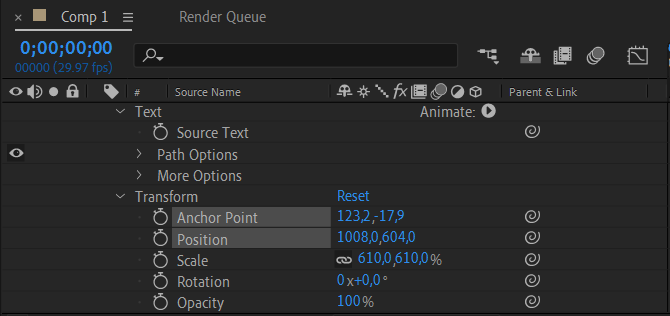
The center point, also known as the anchor point, is a pivotal element that determines the position, rotation, and scale of a layer. By manipulating the center point, you can effortlessly create eye-catching visuals, add dynamic movement, and enhance the overall visual appeal of your animations.
In this comprehensive guide, we will walk you through the step-by-step process of changing the center point in After Effects. Whether you are a seasoned motion graphics professional or a beginner just starting with After Effects, this article will equip you with the knowledge and techniques to take your animations to the next level.
Get 10% off when you subscribe to our newsletter

Get ready to dive in and explore the art of center point manipulation in After Effects. Unleash your creativity and unlock the power of precise positioning and seamless animation effects that will captivate your audience. Let’s get started!
How to Change the Center Point in After Effects: Step-by-Step Guide
When it comes to changing the center point in After Effects, there are several methods you can employ. Let’s explore a few tried and tested techniques that will empower you to manipulate the center point with ease:
1. Using the Anchor Point Tool:
The primary and most direct method for changing the center point involves using the Anchor Point Tool. To activate this tool, select the layer you want to modify and press the Y key on your keyboard. This action changes your cursor to the Anchor Point Tool, enabling you to click and drag the center point to your desired location within the composition. To complete the process, move the cursor to the layer’s central point, press and hold the mouse button, drag the anchor point to the desired position within the composition, release the mouse button, and conclude the editing by pressing the V key to revert to the standard selection tool.


2. Using the Pan Behind (Anchor Point) Tool:
Another efficient way to alter the center point is through the use of the Pan Behind (Anchor Point) Tool. You can access this tool by pressing the A key twice. This tool not only allows you to change the position of the center point but also enables you to adjust the rotation and scale of the layer with precision. It’s a versatile tool that can significantly enhance your animation workflow.
Get 10% off when you subscribe to our newsletter


3. Utilizing Keyboard Shortcuts:
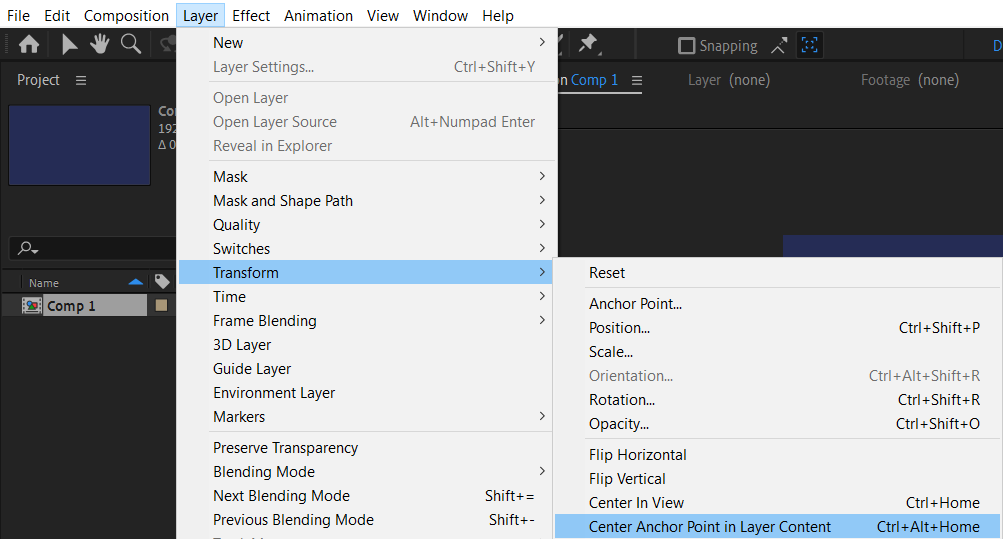
For those who prefer maximizing efficiency in their workflow, After Effects offers a range of handy keyboard shortcuts to simplify the process of changing the center point. To reposition the anchor point to the center of a layer, simply select the layer and press Ctrl/Cmd + Alt/Option + Home. This instantly snaps the anchor point to the center coordinates and saves you valuable time.
Get 10% off when you subscribe to our newsletter


4. Using the Pan Behind Anchor Point Preset:
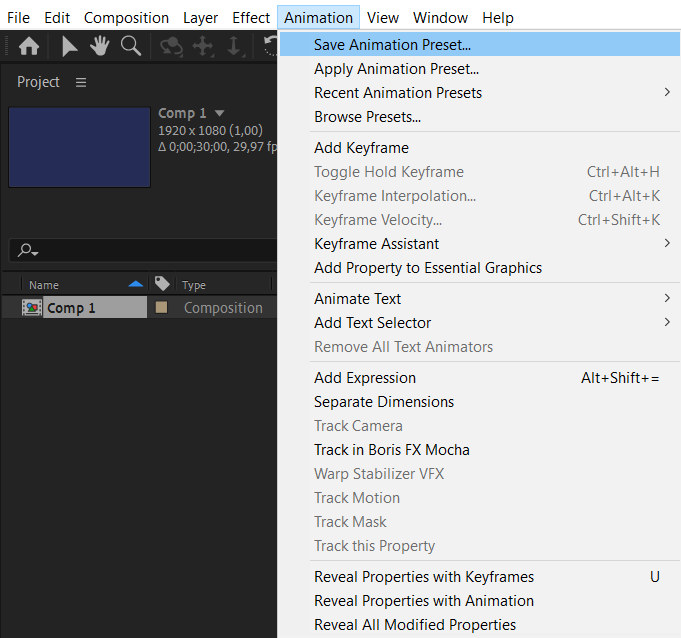
If you find yourself frequently needing to change the center point to a specific location, consider creating a Pan Behind Anchor Point Preset. To do this, first, adjust the center point manually using any of the methods mentioned above. Then, go to the Animation menu, select “Save Animation Preset,” and save it as a preset that you can reuse in your future projects. This will save you from repeatedly having to position the anchor point manually, allowing you to quickly apply the preset whenever needed.

By leveraging these techniques, you’ll have the power to effortlessly change the center point in After Effects and achieve precise positioning and smooth animation effects. Experiment with the different methods and find the ones that work best for your specific project needs.
Remember, the center point plays a significant role in determining how your layers move, rotate, and scale within your composition. Mastering this fundamental aspect of After Effects opens up a world of creative possibilities and ensures that your motion graphics stand out from the crowd.
Get 10% off when you subscribe to our newsletter

Now that you have a solid understanding of how to change the center point in After Effects, it’s time to put your newfound knowledge into practice. Don’t be afraid to experiment and push your creative boundaries to create truly captivating animations. Happy center point manipulation!
Conclusions – Mastering the Center Point in After Effects
Congratulations! You’ve now learned how to change the center point in After Effects and discovered the importance of this fundamental aspect in creating captivating motion graphics. By manipulating the center point, you have the power to achieve precise positioning, seamless animations, and visually stunning effects.
Throughout this step-by-step guide, we explored various techniques, including using the Anchor Point Tool, the Pan Behind (Anchor Point) Tool, and helpful keyboard shortcuts. We also highlighted the option of creating and saving Pan Behind Anchor Point Presets for efficient future use.
Remember, mastering the art of center point manipulation opens up endless possibilities for creating dynamic, engaging, and professional-looking animations. With practice, you’ll develop a keen eye for proper center point placement, allowing you to optimize the visual appeal and overall impact of your motion graphics.
Get 10% off when you subscribe to our newsletter

The center point is a critical element in the language of motion graphics, influencing how elements move, scale, and rotate within your compositions. By harnessing the power of the center point, you’ll be able to bring your creative ideas to life, making stunning animations that captivate your viewers.
So, go ahead and explore the diverse range of options available to you when changing the center point in After Effects. Let your imagination run wild, experiment with different techniques, and push the boundaries of your motion graphics projects.
Now that you’ve armed yourself with this valuable knowledge, it’s time to put it into practice. Embrace the center point as a powerful tool in your After Effects arsenal, and let it elevate your animations to new heights.
Happy creating!


