How to Add Markers on After Effects: A Comprehensive Step-by-Step Guide
Introduction – Mastering Marker Placement in After Effects
Whether you’re a seasoned motion graphics designer or just starting to explore the exciting world of animation, knowing how to effectively use markers in Adobe After Effects can drastically improve your workflow. Markers serve as visual cues, allowing you to precisely time and coordinate different elements in your compositions.
In this article, we’ll guide you through the process of adding markers in After Effects, helping you make the most out of this powerful feature. We’ll cover various techniques, tips, and tricks to ensure you become a pro at marker placement, making your editing process seamless and efficient.
From placing markers to syncing audio, labeling key moments, and even utilizing markers for collaboration with your team, we’ll dive into the diverse applications of this tool. No matter your project’s scale or complexity, markers are an invaluable asset that can save you time, streamline your workflow, and enhance your creative output.
Get 10% off when you subscribe to our newsletter

So, whether you’re working on a short film, a promotional video, or an animated sequence, get ready to unleash the full potential of After Effects’ markers. By the end of this guide, you’ll have the knowledge and confidence to skillfully incorporate markers into your projects, elevating the overall quality of your animations and visual compositions.
Let’s dive in and explore the art of marker placement in After Effects!
Step-by-Step Guide: How to Add Markers in After Effects
Adding markers in After Effects is a simple yet powerful technique that can significantly enhance your editing process. Here’s a step-by-step guide to help you make the most out of this tool:
1. Select your layer: To begin, select the layer in your composition where you want to add markers. This could be a video, audio, or even a text layer.
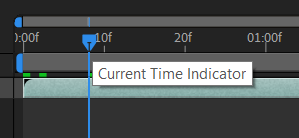
2. Set the playhead: Move the playhead to the specific frame where you want to place a marker. You can use the “Current Time Indicator” (CTI) to accurately navigate through your timeline.
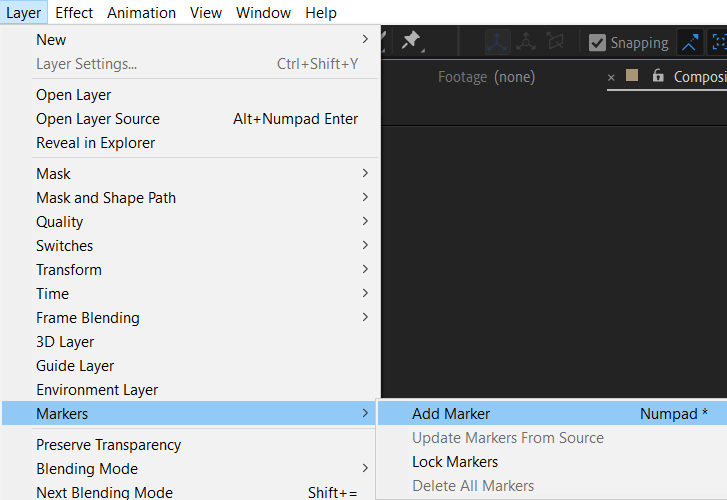
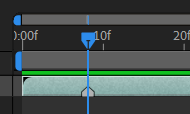
3. Apply a marker: Once the playhead is in position, press the “*” key on your keyboard to add a marker at that frame. Voila! You’ve just added your first marker.
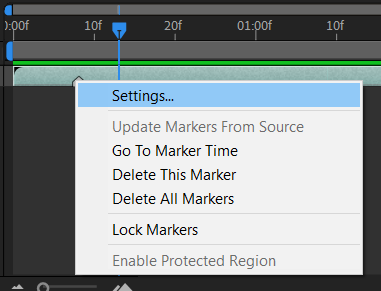
4. Adding comments and notes: You can also add comments or notes to your markers. Simply select the marker, right-click on it, and choose “Settings.” This feature is particularly useful for collaboration and providing feedback to your team members.
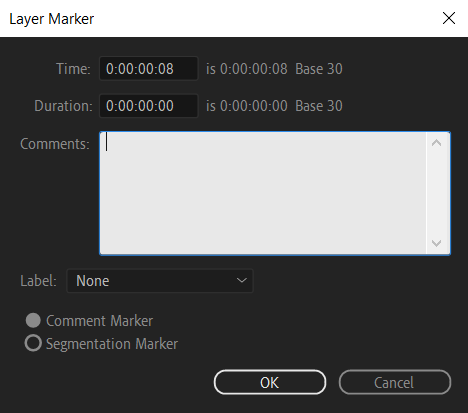
5. Syncing markers with audio: If you’re working with audio, you can sync your markers to specific beats or timestamps. Select the audio layer, press “L” to reveal audio waveform, and then press “LL” to reveal its duration. You can now use the waveform to accurately align your markers with the audio cues.
 6. Moving and deleting markers: To move a marker, simply click and drag it along the timeline. If you want to delete a marker, select it and press the “Delete” key on your keyboard.
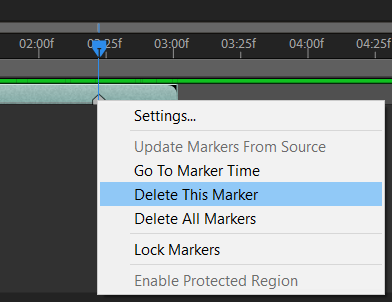
7. Utilizing marker shortcuts: After Effects provides useful shortcuts to further speed up your workflow. Pressing the “J” hotkey allows you to jump to the first marker in your composition, while “K” takes you to the second marker, and so on.
By following these steps and utilizing these tips, you can efficiently add and manage markers in After Effects. Experiment with different ways of using markers to streamline your editing process, improve collaboration, and create visually engaging compositions.
Now, go ahead and grab your keyboard, unleash the power of markers in After Effects, and take your animations to the next level!
Conclusion – Mastering Markers for Enhanced Efficiency in After Effects
In conclusion, markers are an indispensable tool in Adobe After Effects that can significantly enhance your editing process. By following the step-by-step guide provided, you can easily add, customize, and utilize markers in your compositions with precision and ease.
Markers serve as visual cues for timing, syncing audio, labeling key moments, and collaborating with your team. They allow you to streamline your workflow, make precise edits, and maintain organization within your projects. Whether you’re working on a short animation or a complex motion graphics sequence, incorporating markers will undoubtedly boost your efficiency and creativity.
Remember to leverage the hotkeys and shortcuts mentioned to further expedite your marker placement and navigation within your timeline. Utilize the ability to add comments to enhance communication and collaboration with your team members.
As you gain more experience and familiarity with markers, explore creative ways to utilize them in your projects. Whether you’re creating animations, editing videos, or designing visual effects, markers can help you maintain pacing, establish rhythm, and bring your vision to life.
So, don’t hesitate to harness the power of markers in After Effects. Incorporate them into your workflow, refine your editing process, and elevate the overall quality of your animations and visual compositions.
Now, armed with this comprehensive guide, go ahead and add markers like a pro in After Effects. Unlock new possibilities, enhance your editing efficiency, and create stunning visuals that captivate your audience.
Happy marker placement, and may your animations thrive with precision and creativity!


