Discover the secrets of enhancing your After Effects animations with eye-catching stroke effects. Learn how to effortlessly add strokes to your designs, animations, and text elements, elevating your visual storytelling to new heights. Follow our step-by-step guide to mastering stroke effects in After Effects and create stunning visuals that leave a lasting impact.
Unlocking the Power of Stroke Effects in After Effects
Adding strokes to your animations and designs in After Effects can take your visuals to a whole new level. Whether you want to emphasize specific elements, create dynamic motion graphics, or make your text pop, stroke effects are an essential tool in every motion designer’s arsenal. In this comprehensive guide, we will walk you through the process of adding strokes in After Effects, giving your projects a professional edge and captivating your audience.
After Effects offers a variety of stroke options that allow you to customize the thickness, color, and texture of your strokes. With a few simple steps, you can transform your static designs into dynamic and visually appealing animations that grab attention. Whether you’re a beginner or an experienced motion designer, this tutorial will help you sharpen your skills and unleash your creativity.
In the following sections, we will guide you through the process, step by step. From creating a new composition to adding and customizing strokes, we will cover everything you need to know to achieve stunning results. Let’s get started and take your animations to the next level!
Adding Stroke Effects in After Effects: Step-by-Step Guide
1. Create a New Composition
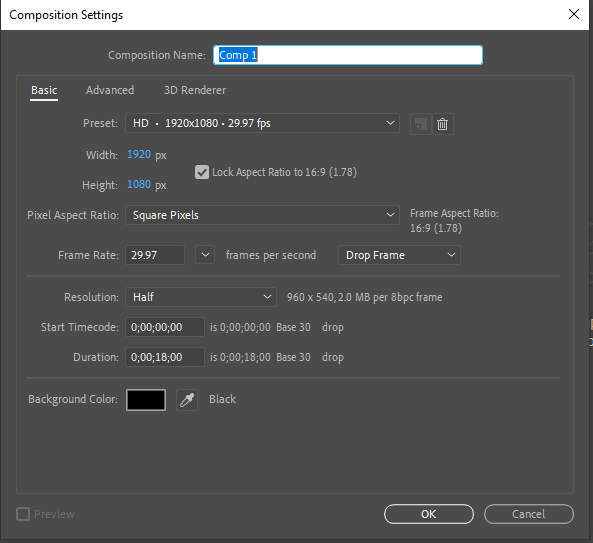
Open After Effects and create a new composition by navigating to the “Composition” menu and selecting “New Composition” or hit Ctrl (Windows) or Command (Mac) + N. Set the desired settings for your composition, such as the resolution, duration, and frame rate.
2. Import Your Assets
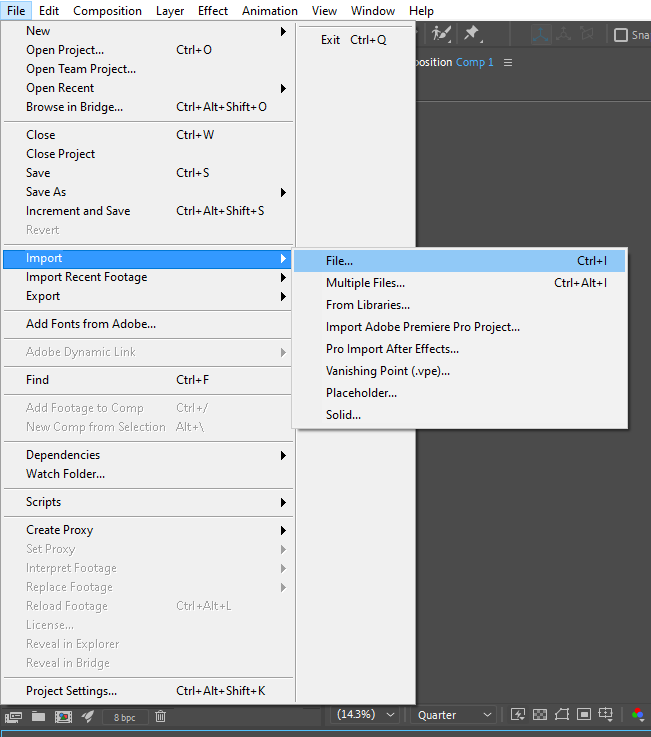
Import the text or a vector file you want to add stroke effects to by going to the “File” menu and choosing “Import” > “File.” Browse for the files on your computer and select them to import into your project.
3. Adding the Layer
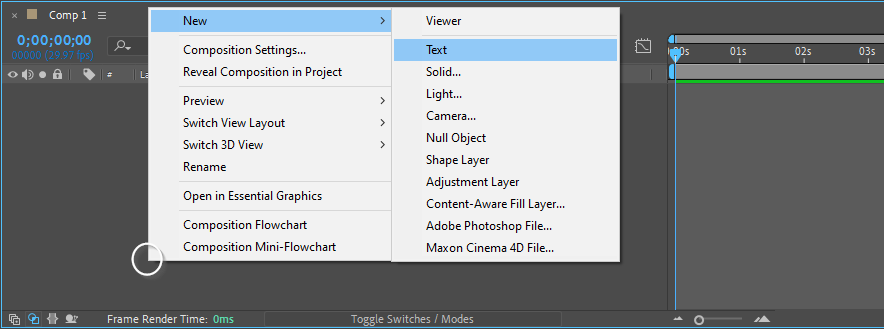
Choose the layer or layers you want to apply the stroke effect to in the Project panel and drag and drop it to the Composition panel. You can select multiple layers by holding down the Ctrl (Windows) or Command (Mac) key while clicking on the layers. Or you can create it by right clicking – New – Text or a Shape Layer.
4. Create a path
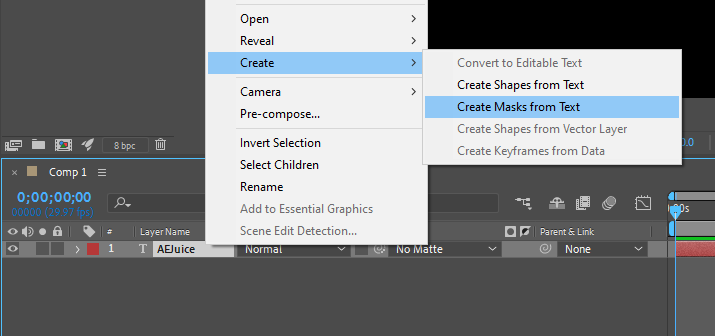
To create a path for a stroke effect, right-click on the layer – Create – Create Masks from Text.
5. Apply the Stroke Effect
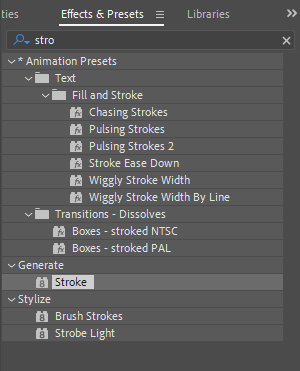
Go to the “Effects & Presets” panel and search for the “Stroke” effect. Once found, drag and drop the effect onto the created layer in the Composition panel. The Stroke effect will now be applied to the layer.
6. Customize the Stroke Settings
With the layer still selected, navigate to the “Effect Controls” panel. Here, you can adjust the stroke settings to your liking. You can change the stroke color, thickness, opacity, and animate the stroke over time using keyframes.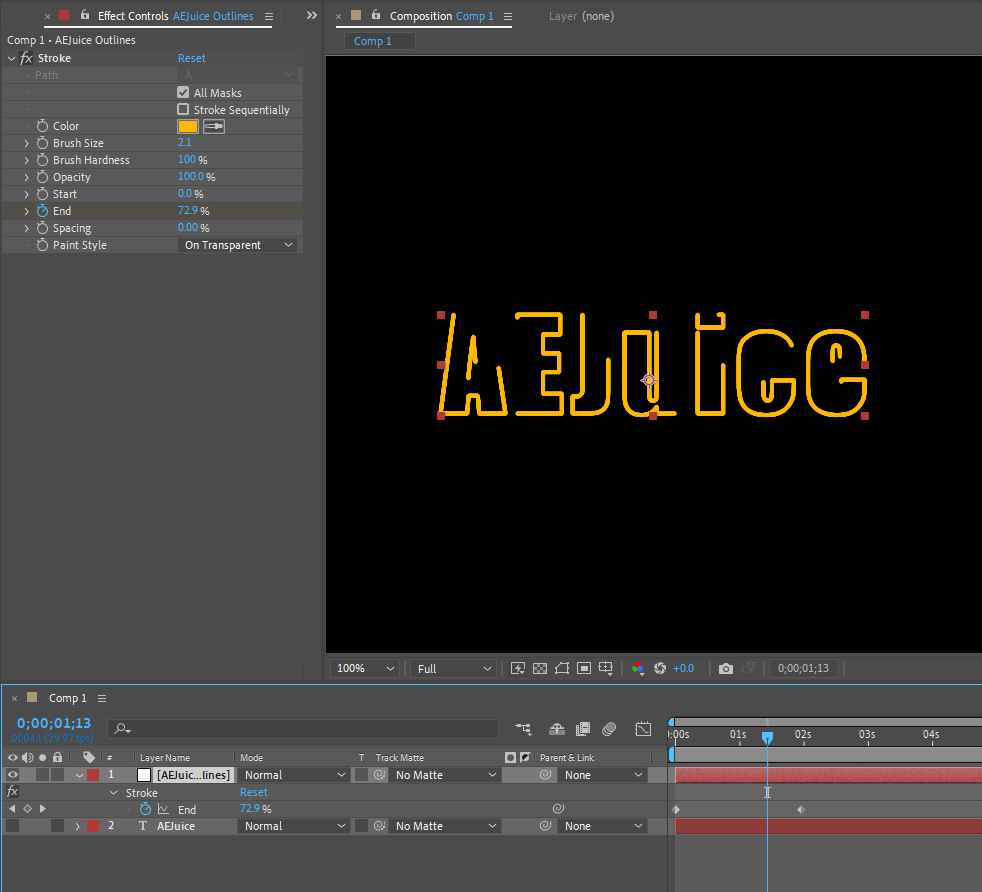 7. Use Layer Styles
To further enhance your stroke effects, you can use layer styles in After Effects. Right-click on the layer and choose “Layer Styles” > “Stroke” to access additional options. Here, you can refine the stroke style by adjusting parameters such as blending mode, feathering, and more.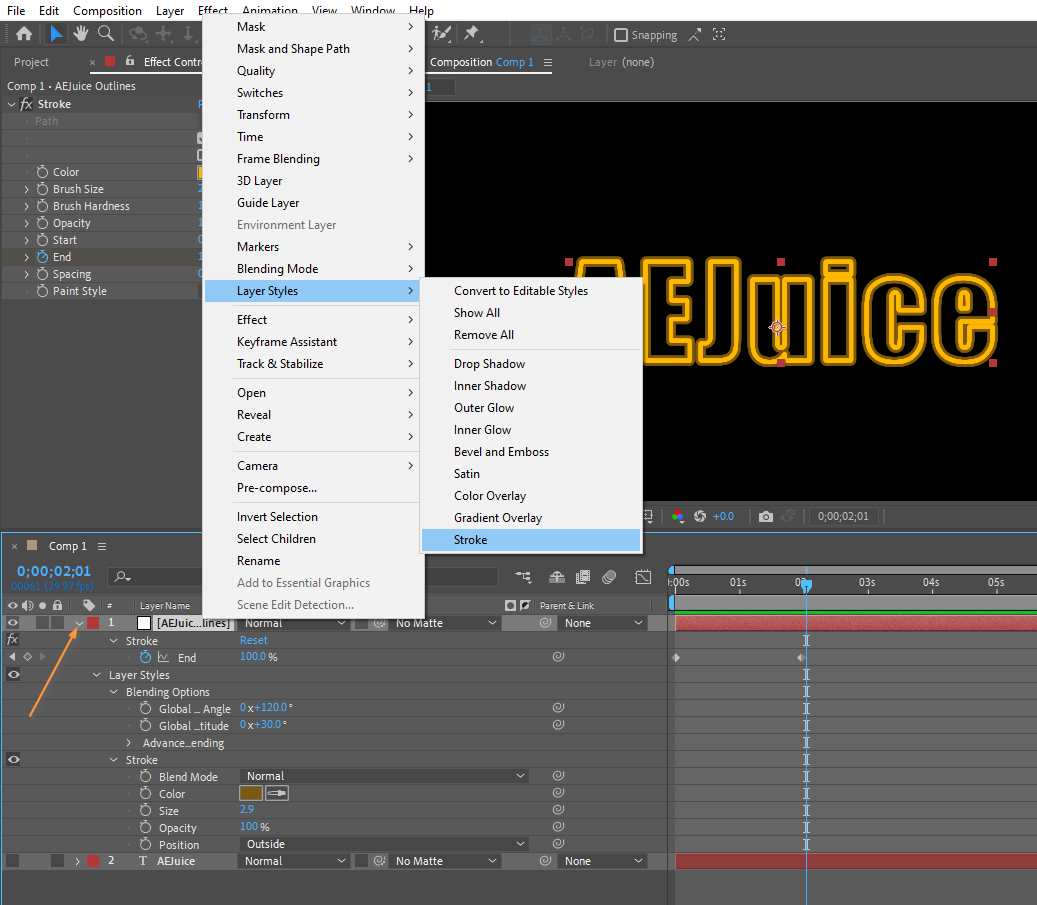 8. Preview and Render
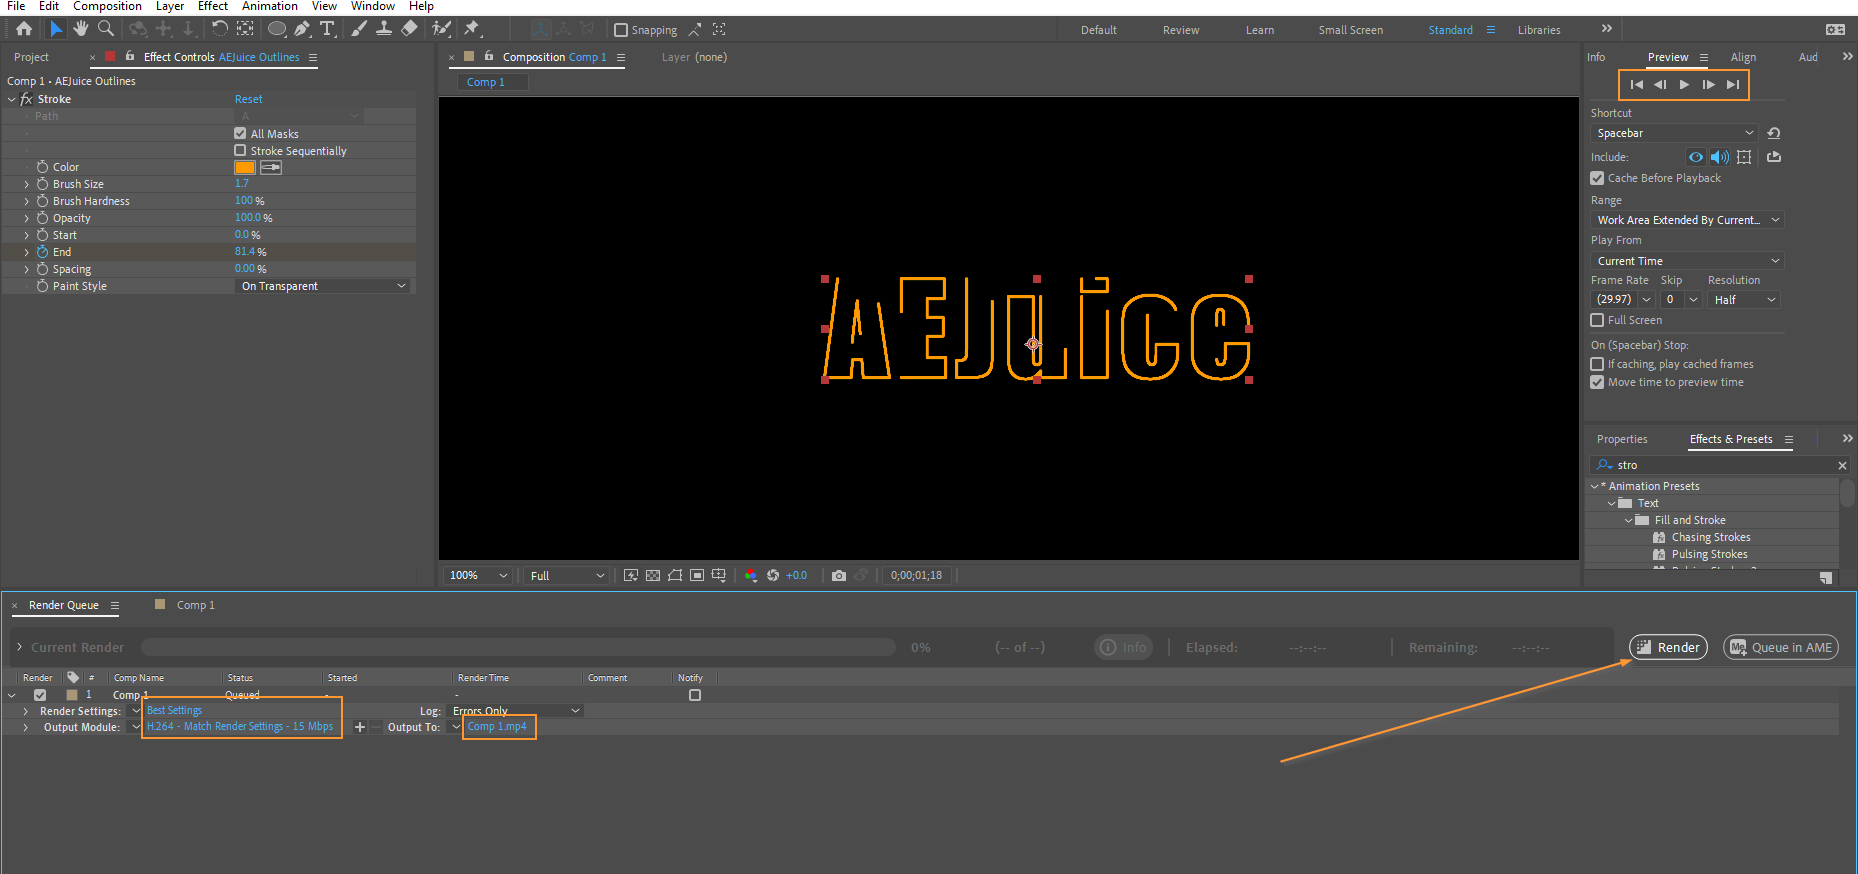
Once you’re satisfied with your stroke effects, preview your composition by pressing the Spacebar key or by clicking the “RAM Preview” button. If you’re happy with the result, you can render your composition by going to the “Composition” menu and selecting “Add to Render Queue.” Adjust the render settings and output format, then click the “Render” button to export your finalized composition with the stroke effects.
By following these step-by-step instructions, you can easily add stroke effects to your animations and designs in After Effects. Remember to experiment and unleash your creativity to achieve stunning and captivating visuals that make your projects stand out.
Conclusion
Congratulations! You have successfully learned how to add stroke effects in After Effects. By following this step-by-step guide, you can now enhance your animations, designs, and text elements with captivating strokes that bring your visuals to life.
Stroke effects offer endless possibilities for creating dynamic and visually appealing motion graphics. By customizing stroke settings, experimenting with layer styles, and animating strokes along motion paths, you have the tools to unleash your creativity and leave a lasting impact on your audience.
Remember to continuously explore and push the boundaries of what stroke effects can do. With practice, you will gain a deeper understanding of how stroke effects can elevate your visual storytelling and take your motion design skills to new heights.
So go ahead, experiment, and let your imagination run wild. Add strokes to your projects, play with different colors and thicknesses, and make your visuals pop. The possibilities are endless, and with After Effects as your creative playground, the sky’s the limit.
Now that you have learned how to add stroke effects in After Effects, it’s time to put your newfound skills to use. Start incorporating stroke effects into your designs and animations, and watch as your creations come to life with vibrant strokes that captivate and engage your audience.
Remember, practice makes perfect, so keep honing your skills and exploring the vast world of After Effects. Happy creating!

