Mastering Keyframe Types in After Effects: Elevate Your Animation Game
Introduction – Exploring the Power of Keyframe Types in After Effects
Keyframes are an essential part of creating dynamic and captivating animations in After Effects. They allow you to define the values of different properties at specific points in time, giving life to your artwork. But did you know that you can go beyond the traditional linear keyframes and unlock a whole new level of creativity by changing keyframe types?
Get 10% off when you subscribe to our newsletter

In this article, we will explore the power of keyframe types in After Effects and show you how to unleash their full potential. We’ll guide you through the step-by-step process of changing keyframe types, enabling you to create smoother, more organic animations that will truly captivate your audience.
Whether you’re a seasoned motion graphics artist or just starting your journey in After Effects, understanding and using different keyframe types can greatly enhance the impact of your animations. So, let’s dive in and discover how to take your motion graphics to the next level with the art of keyframe types in After Effects.
Get 10% off when you subscribe to our newsletter

Understanding Keyframe Types and Their Importance
Before we delve into the process of changing keyframe types in After Effects, let’s understand what keyframe types are and why they are important in your animation workflow.
Keyframe types determine how property values change over time between two specified keyframes. By default, After Effects uses linear keyframes, which provide a straight and consistent transition between two values. However, this can often lead to animations that feel robotic or lack fluidity.
Get 10% off when you subscribe to our newsletter

That’s where changing keyframe types comes into play. By utilizing different keyframe types, we can introduce variations in the speed and trajectory of our animations, making them more natural and visually appealing. From smooth and eased transitions to sudden bursts of energy, the possibilities are endless.
Now that we grasp the significance of keyframe types, let’s explore some valuable tips and techniques for changing them effectively in After Effects.
Tips for Changing Keyframe Types in After Effects
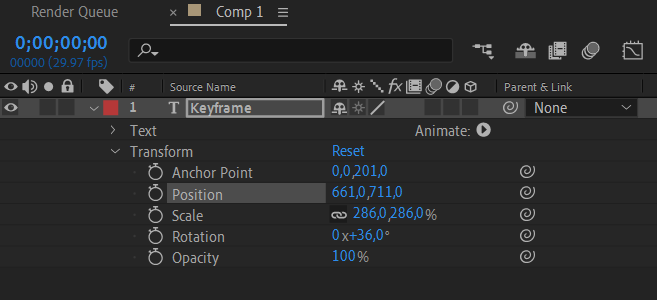
1. Utilize the Animating: Select the layer with the set keyframe and navigate to the Transform section. Expand it to reveal tools such as Anchor Point, Position, Scale, and others. Adjust the animation using these tools.

To retain the position of the keyframe at a specific moment, press the Time – Varу stopwatch button (toggle ability of property to change over time; Alt-click: add or remove expression).

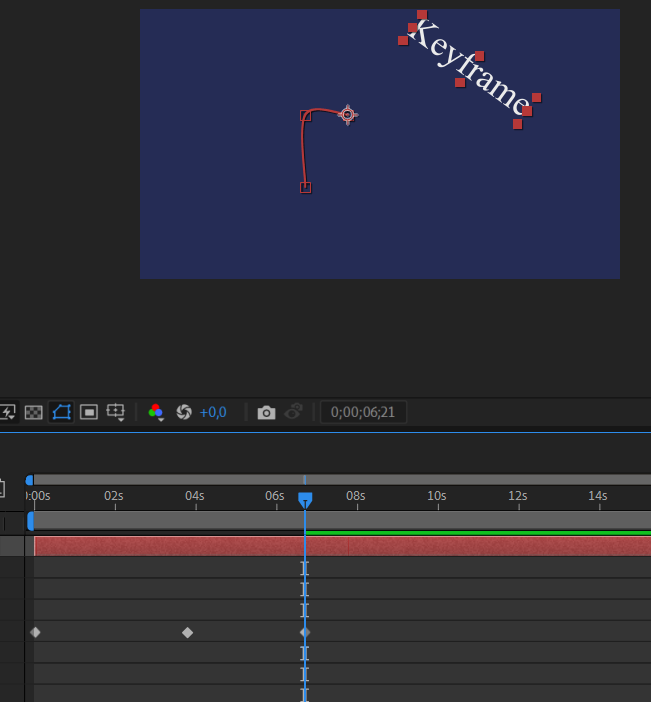
Move the current time indicator forward and configure the next keyframe. Repeat this process as needed, editing your animation.

2. Apply Ease Keyframes: In animation tools like “Keyframe Assistant” in After Effects, three valuable options for controlling the dynamics of object motion are available: “Easy Ease,” “Easy Ease In,” and “Easy Ease Out.” Applying “Easy Ease” makes transitions between keyframes smoother by incorporating deceleration at the motion’s beginning and end—achieved by using F9. For “Easy Ease In,” introducing deceleration to the initial keyframe creates a more gradual start to the motion, and this is activated using Shift + F9. Meanwhile, “Easy Ease Out” applies deceleration to the final keyframe, resulting in a smoother motion decay, accessible with Ctrl/Cmd + Shift + F9. These tools enable easy manipulation of animation curves, providing a natural and organic feel.

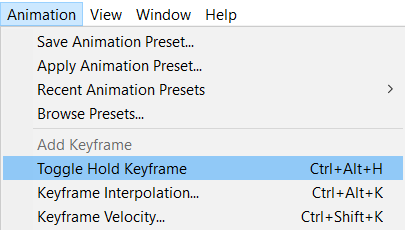
3. Use Hotkeys for Efficiency: Toggle Hold Keyframe in After Effects enables or disables the hold mode, where the object value instantly changes between keyframes. The shortcut for this function is Ctrl/Cmd + Alt + H. Keyframe Interpolation determines how a smooth transition occurs between keyframes, and Ctrl/Cmd + Alt + K is used for quick access to Interpolation settings. Keyframe Velocity adjusts the speed of value changes between keyframes and can be edited using Ctrl/Cmd + Shift + K and the curve editor in the program. Understanding these aspects makes it easier and more precise to control animation dynamics in After Effects.

4. Combine Keyframe Types: Don’t limit yourself to using a single keyframe type throughout your animation. Consider combining different types strategically to add depth and interest to your motion graphics. Mixing Easy ease in and Easy ease out keyframes can create smoother transitions, while incorporating hold keyframes at crucial points can add dynamic pauses. Experiment with speed changes by blending linear and easy keyframes, introducing a dynamic rhythm to your animation.
By following these tips and techniques, you’ll be well-prepared to change keyframe types in After Effects and elevate the quality of your motion graphics. Remember, practice makes perfect, so don’t hesitate to experiment and push the boundaries of your creativity.
Conclusion
Mastering keyframe types in After Effects empowers you to infuse your animations with seamless, realistic, and creative motion. Understanding and strategically applying different keyframe types allows you to craft motion graphics that engage and captivate your audience.
Get 10% off when you subscribe to our newsletter

In conclusion, the ability to change keyframe types in After Effects is a potent technique that elevates animations from ordinary to extraordinary. By grasping the significance of keyframe types and implementing them strategically, you can produce animations that are not only smooth and organic but also visually compelling.
We delved into tips and techniques such as leveraging Animation, employing easy keyframes, utilizing hotkeys for efficiency, experimenting with Animation Keyframes, and combining various keyframe types. These approaches enable you to unlock a realm of creativity and make your animations truly stand out.
Get 10% off when you subscribe to our newsletter

Remember, mastering keyframe types demands practice and experimentation. So, fearlessly explore and push the boundaries of what can be achieved. The more you acquaint yourself with different keyframe types and their impact on animations, the more confident and skilled you will become.
Go ahead and unleash the power of keyframe types in After Effects. Elevate your motion graphics and captivate your audience with animations that are smooth, dynamic, and visually stunning. Armed with these newfound skills, you’re on the path to becoming a master animator in After Effects. Happy animating!


