Want to enhance the quality and performance of your After Effects projects? Learn how to effectively change the renderer in After Effects with this comprehensive guide. Discover different renderers and unlock their potential to take your animations and visual effects to the next level.
Mastering the Art of Changing the Renderer in After Effects
Have you ever wondered how to maximize the quality and performance of your After Effects projects? As a motion graphics artist or video editor, you know that the renderer plays a crucial role in bringing your creations to life. Understanding how to effectively change the renderer in After Effects can make a world of difference in the final output of your animations and visual effects.
In this article, we will take you through a step-by-step guide on how to change the renderer in After Effects. Whether you are a beginner or an experienced user, this comprehensive guide will empower you to explore the various renderers available and utilize their unique features to create stunning visuals.
By the end of this article, you will have gained a deeper understanding of the importance of the renderer and the ability to harness its full potential to push your creative boundaries. So, let’s dive in and unlock the secrets of changing the renderer in After Effects!
Understanding the Renderer:
Before we jump into the process of changing the renderer, let’s take a moment to understand what a renderer is and why it matters. In After Effects, a renderer is a software component responsible for generating the final image or animation based on your composition and settings.
The choice of renderer can have a significant impact on the overall quality, speed, and capabilities of your output. After Effects offers multiple renderers, each with its own set of features and optimizations to suit different project requirements.
Types of Renderers in After Effects:
1. Classic 3D Renderer:
This is the default renderer in After Effects, which uses CPU (Central Processing Unit) to process the calculations for 3D elements. While it is reliable and compatible with most plugins and effects, it may not offer the speed and advanced features of other renderers.
2. Ray-traced 3D Renderer:
This renderer utilizes your computer’s GPU (Graphics Processing Unit) to render realistic 3D scenes with reflections, refractions, and shadows. However, note that this renderer has been deprecated in After Effects CC 2015 and is no longer actively developed or supported by Adobe.
3. Cinema 4D Render:
This renderer is the go-to choice for 3D artists and designers. It leverages the power of Maxon’s Cinema 4D software, seamlessly integrated into After Effects, to create intricate 3D scenes and animations.
4. Third-Party Renderers:
Apart from the built-in renderers, many third-party plugins offer advanced rendering solutions for After Effects. These include renderers like Redshift, Octane, and Arnold, which provide additional features, efficiency, and quality for specific project requirements.
Now that you have an overview of the different renderers in After Effects let’s move on to the step-by-step process of changing the renderer.
Remember, the choice of the renderer depends on the specific needs of your project. Experimenting and exploring different renderers will help you find the optimal solution for each scenario.
Step-by-Step Process: Changing the Renderer in After Effects
Now, let’s walk through the process of changing the renderer in After Effects. Follow these steps to switch to a different renderer and unlock new possibilities for your projects:
1. Open After Effects and create a new composition or open an existing project.
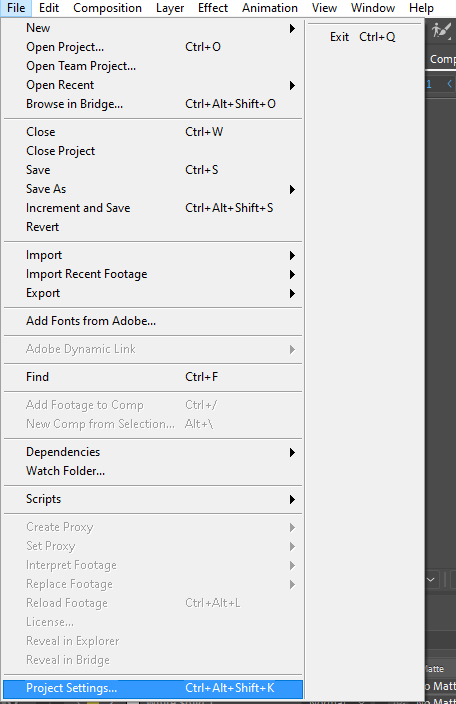
2. Go to the File menu at the top and select Project Settings.
3. In the Project Settings dialog box, navigate to the Video Rendering and Effects tab. 4. Under the Use drop-down menu, select the desired renderer that suits your project requirements. For example, choose Cinema 4D Renderer for advanced 3D scene creation or Mercury GPU Acceleration for fast and efficient GPU rendering.
5. Adjust any additional settings specific to the chosen renderer, such as customizing lighting, materials, or 3D options
6. Click OK to apply the changes and return to your composition.
Congratulations! You have successfully changed the renderer in After Effects. Now, you can take full advantage of the chosen renderer’s unique features and capabilities to enhance your projects’ visual impact.
Expert Tips for Changing the Renderer in After Effects
When it comes to changing the renderer in After Effects, there are a few expert tips that can help streamline your workflow and make the process even more efficient. Whether you’re a seasoned pro or just starting out, consider these valuable pieces of advice:
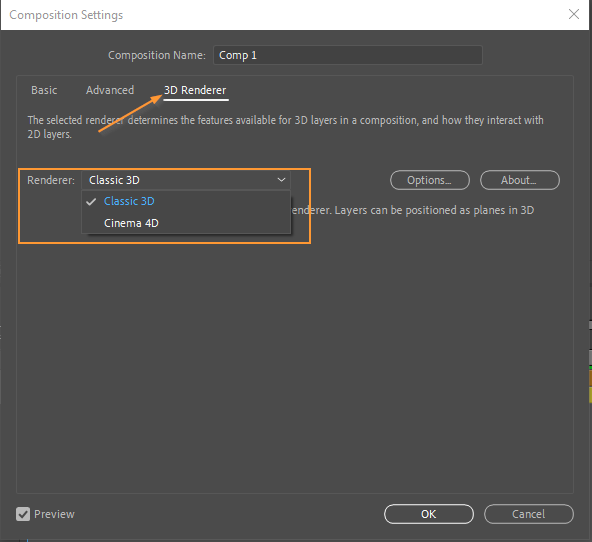
1. Utilize Hotkeys: To save time and navigate through After Effects quickly, make use of hotkeys for common tasks. For example, press Ctrl+K (or Command+K on Mac) to open the Composition Settings dialog box, where you can access the Renderer drop-down menu and change the 3D renderer swiftly.
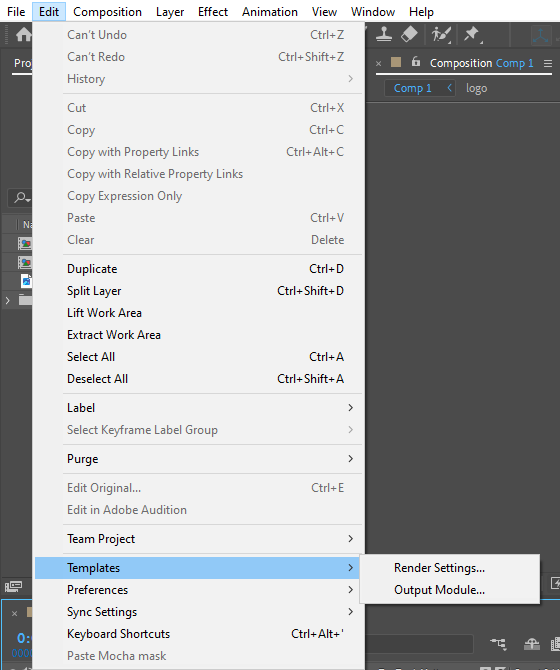
 2. Create Custom Render Presets: If you often work on projects with similar rendering requirements, consider creating custom render presets. This allows you to save and reuse specific settings combinations, making it easy to switch between renderers without manually adjusting each parameter.
 3. Optimize Graphics Card Settings: When using GPU-dependent renderers like the Ray-traced 3D Renderer or Element 3D Renderer, ensuring that your graphics card drivers are up to date is crucial. Additionally, check the preferences in After Effects to optimize the GPU settings for the best performance.
 4. Explore Third-Party Plugins: While After Effects offers powerful built-in renderers, don’t hesitate to explore third-party plugins and renderers. They often provide additional features, speed, and efficiency that can take your projects to new heights. Keep an eye out for reputable plugins like Redshift or Octane, which are favored by industry professionals.
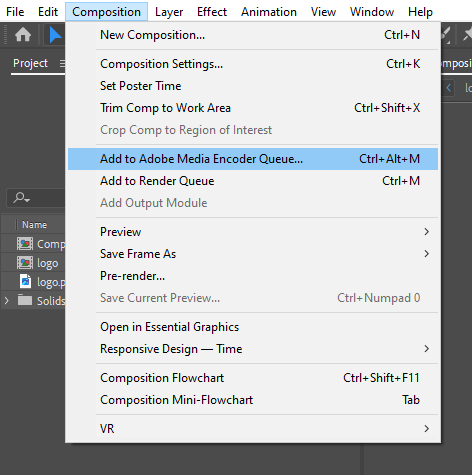
5. Consider Rendering in Background: Rendering in After Effects can sometimes be time-consuming, especially with complex compositions. To continue working on other tasks while rendering, use Adobe Media Encoder option if available under the “Composition” menu or by pressing Ctrl+Alt+M (or Command+Alt+M on Mac). 6. Monitor Your System Resources: Changing the renderer in After Effects can put a significant load on your computer’s CPU or GPU, depending on the chosen option. Keep an eye on your system resources, especially the CPU and GPU usage, to ensure a smooth rendering process without overheating or performance issues.
By following these expert tips, you can streamline your workflow, optimize your render settings, and make the most out of the various renderers in After Effects. Remember to experiment, practice, and stay up to date with new techniques and developments in the world of rendering.
Conclusion:
Changing the renderer in After Effects is a powerful tool that can elevate the quality and performance of your projects significantly. By understanding the different renderers available, mastering the process of switching between them, and following expert tips, you can unlock new creative possibilities and create stunning animations and visuals.
Don’t be afraid to explore and experiment with different renderers, plugins, and settings. Embrace the versatility that After Effects offers and push the boundaries of your creativity.
Now that you’re armed with the knowledge and advice provided in this article, it’s time to dive into After Effects and start harnessing the power of changing the renderer. Happy rendering and may your projects shine brighter than ever before!

