Are you looking to add a touch of magic to your videos? The captivating effect of slow motion can elevate your footage, creating an atmosphere of elegance, intensity, and drama. Whether you’re working on a cinematic project or simply want to add some flair to your social media content, mastering slow motion in After Effects is an essential skill.
In this comprehensive guide, we will walk you through the step-by-step process of creating stunning slow motion effects in After Effects. We will explore various techniques, tools, and settings that will allow you to manipulate time and transform ordinary footage into extraordinary moments.
By the end of this article, you will have the knowledge and confidence to confidently incorporate slow motion effects into your editing workflow. So let’s dive in and unlock the full potential of slow motion in After Effects!
Essential Techniques and Tips for Mastering Slow Motion in After Effects
Slow motion can be a powerful storytelling tool, enhancing emotions and creating a captivating viewing experience. In After Effects, achieving this effect is easier than you might think. Let’s explore some essential techniques and tips that will help you master the art of slow motion.
1. Adjusting Frame Rates:
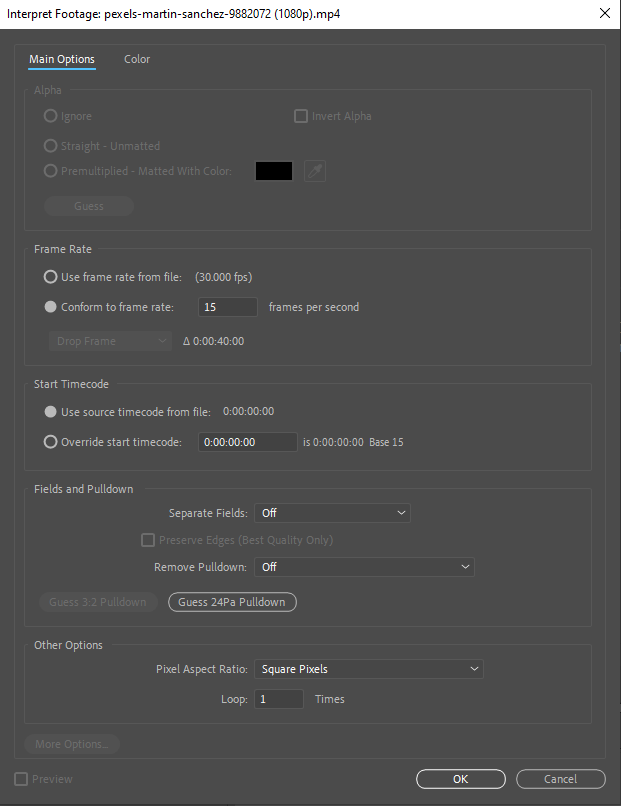
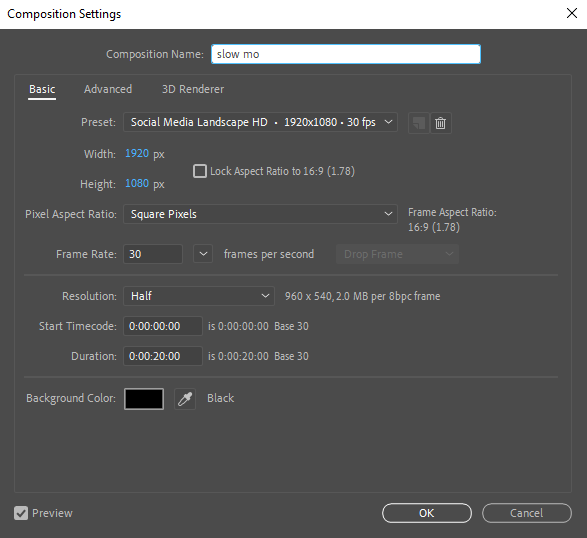
The first step to creating slow motion in After Effects is adjusting the frame rate of your composition. Right-click on your composition in the Project panel, select “Interpret Footage,” and choose “Main…” In the new window, decrease the frame rate to a fraction of your original footage. For example, if your original footage is 30 frames per second (fps), setting it to 15 fps will double the duration and create a smooth slow motion effect. Pro Tip: To increase precision, use the hotkey “Ctrl+K” to open the Composition Settings. Here, you can adjust the frame rate directly.
 2. Using Time-Remapping Techniques:
Another way to achieve slow motion in After Effects is by utilizing time-remapping techniques. Simply enable time-remapping for your footage layer by right-clicking and selecting “Time” > “Enable Time Remapping.” This will create two keyframes – one at the beginning and one at the end of the layer.Drag the second keyframe further down the timeline, extending the duration between the two keyframes. The greater the distance, the slower the motion will appear. Be mindful that adjusting the keyframes too far apart can result in a jerky effect, so experiment with different timings to find the desired smoothness. Pro Tip: Use the “~” (tilde) key to maximize the layer panel for a better view while adjusting keyframes.
3. Adding Easy Ease to Keyframes:
To create a more natural and smooth slow-motion effect, apply the “Easy Ease” option to your keyframes. Simply select your keyframes, right-click, and navigate to “Keyframe Assistant” > “Easy Ease.” This will add acceleration and deceleration to your animation, resulting in a smoother transition between frames. Pro Tip: To apply Easy Ease quickly, use the hotkey “F9” after selecting the keyframes.
4. Experimenting with Speed Ramps:
Speed ramps are a popular technique for combining slow motion with real-time footage seamlessly. Use the “Ramp” effect can be achived with already known Time-Remapping Technique (see p.2), Easy Ease (see p.3), and the Graphic Editor. This technique is especially effective in action sequences or for adding emphasis to specific moments Pro Tip: Use the hotkey “U” to reveal keyframes and other modified properties on selected layers.
5. Playback and Previews:
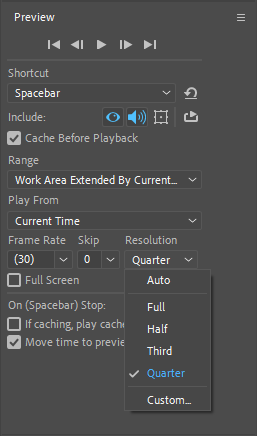
Remember to render or preview your slow motion footage before finalizing your project. Previewing in real-time can be challenging, especially with complex compositions or high-resolution footage. To achieve smoother playback, reduce the resolution in the Preview panel. Pro Tip: Create a RAM preview by selecting your composition and hitting the “0” (zero) key on the numeric keypad.
Mastering slow motion in After Effects opens up a world of possibilities for your video projects. With these techniques and tips, you can now confidently add breathtaking slow motion effects to your footage. Remember to experiment, find your style, and let your creativity shine. So go ahead, start applying these tricks today, and create unforgettable slow-motion moments in your videos!
Conclusions:
Congratulations! You’ve now learned the essential techniques and tips for mastering slow motion in After Effects. By adjusting frame rates, utilizing time-remapping techniques, adding easy ease to keyframes, experimenting with speed ramps, and optimizing playback, you have the tools to create stunning slow motion effects that will captivate your audience.
Remember, practice makes perfect. Don’t be afraid to experiment and push your creative boundaries. Each project is an opportunity to refine your skills and explore new possibilities.
Slow motion has the power to transform ordinary footage into extraordinary moments, adding a touch of elegance, drama, and impact. Whether you’re telling a compelling story, highlighting a particular detail, or simply aiming to create a visually stunning effect, mastering slow motion in After Effects opens up a world of creative possibilities for your videos.
So, go ahead and start incorporating slow motion into your projects. Let your imagination soar and watch as your videos become mesmerizing works of art. Embrace the magic of slow motion in After Effects and elevate your video editing skills to the next level. Happy editing!

