
Creating Eye-Catching GIFs with After Effects: A Simple Guide to Exporting
Introduction: In today’s digital age, GIFs have become a popular and effective way to capture attention, convey emotions, and add a touch of creativity to online content. If you’re an After Effects user looking to harness the power of GIFs, you’re in the right place! In this article, we will guide you through the process of exporting GIFs directly from After Effects, allowing you to showcase your animations and designs in an engaging and easily shareable format.
With After Effects’ extensive range of tools and features, exporting GIFs has never been easier. Whether you want to create a captivating advertisement, a hilarious meme, or a visually stunning social media post, we have got you covered. Our step-by-step guide and expert tips will help you optimize the quality and file size of your GIFs, ensuring they look stunning and load quickly across various platforms.
So, put on your creative hat and join us on this journey to master the art of exporting GIFs from After Effects. Get ready to impress your audience and elevate your visual content game to a whole new level!
Step-by-Step Guide: How to Export GIFs from After Effects
Creating GIFs from After Effects is a straightforward process that requires a few simple steps. Follow this step-by-step guide to export your animations as captivating GIFs:
- Composition Setup:
Start by ensuring your After Effects composition is set up correctly for GIF export. Set the resolution, aspect ratio, and duration according to your desired GIF specifications.
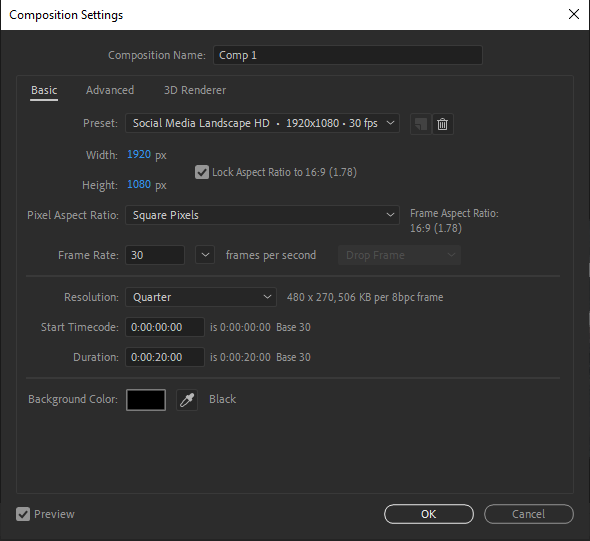
2. Trim Your Composition:
If necessary, use the “Work Area” bar (hotkey: B for beginning and N for end) to trim your composition’s duration to the desired length for your GIF.
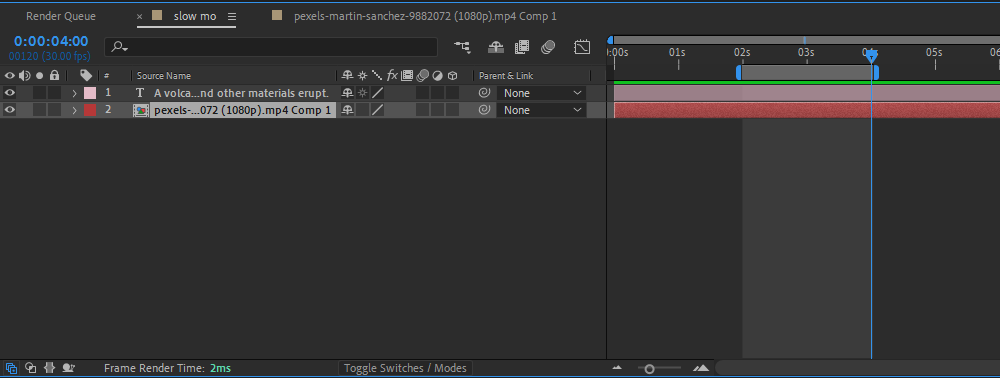 3. Select Output Module:
Open the “Composition” menu and select “Add to Render Queue” (hotkey: Ctrl+M), or you can also right-click on the composition and choose “Composition > Add to Render Queue.” This action will add your composition to the render queue panel.
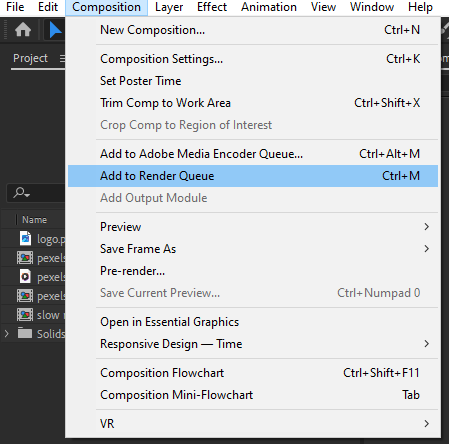
4. Configure Render Settings:
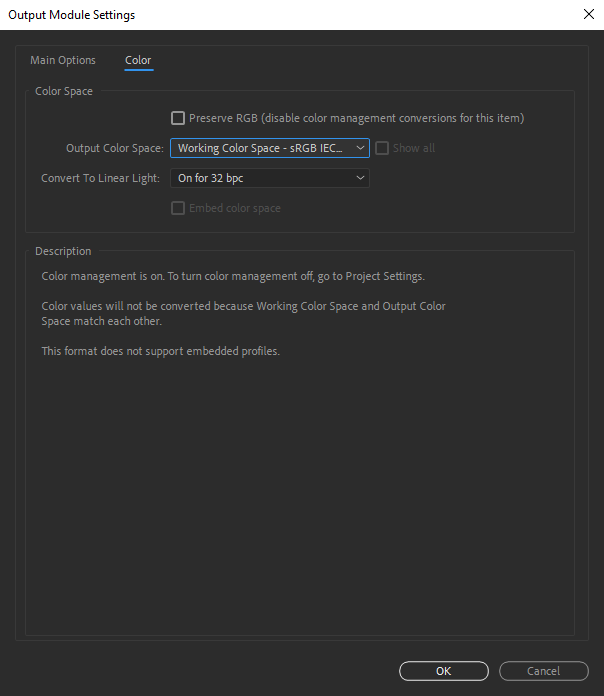
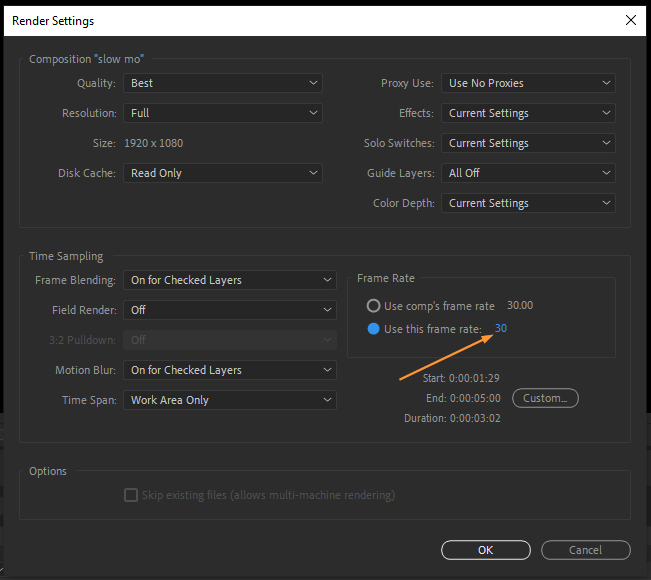
In the Render Queue panel, click on the “Lossless” setting next to “Output Module” and set the desired parameters, such as the frame range in “Render Settings”.
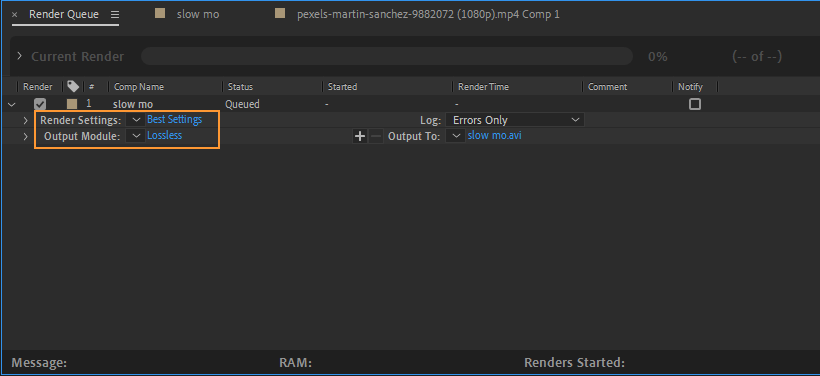
5. Adjust Quality:
To optimize the quality and file size of your GIF, keep in mind that GIFs have a limited color range. Consider reducing color depth or using a limited color palette to minimize the file size without sacrificing too much image quality. You can do this via the “Output Module” settings also.
6. Output File Location:
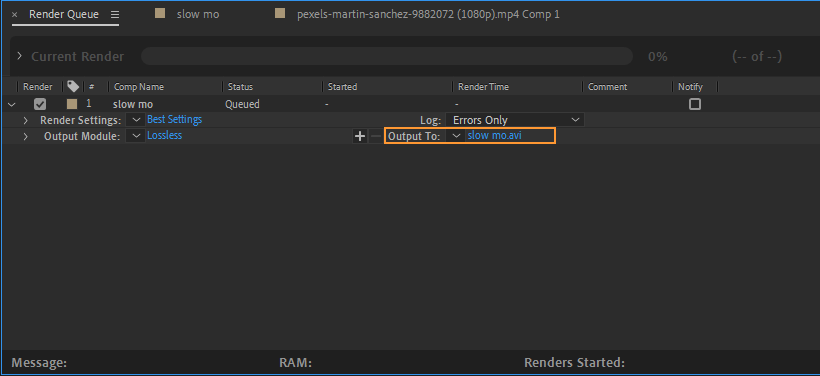
Specify the output file location by clicking on the “Output To” option in the Render Queue panel. Choose a destination folder on your computer where you want to save the exported GIF.
7. Render the GIF:
Once you have adjusted all the necessary settings, click on the “Render” button in the Render Queue panel. Sit back, relax, and let After Effects work its magic. The rendering process may take some time, depending on the complexity of your composition and the length of your GIF.

8. Preview and Optimize:
After the rendering process is complete, open your exported GIF in a web browser or an image viewer to preview the animation. Analyze the quality and file size, and if necessary, revisit step 3 to further optimize the settings for your GIF.
Congratulations! You’ve successfully exported a GIF. Now it’s time to share your animated masterpiece with the world and enjoy the engaging and visually appealing content you’ve created!
Expert Tips for Optimizing GIF Export:
+ Keep an eye on the file size:
Remember that GIFs can quickly become large in size, leading to slower loading times. Strive to find a balance between file size and image quality by optimizing the color palette and using dithering options effectively.
+ Experiment with frame rate:
Depending on your animation, you may want to adjust the frame rate (also known as frame delay) to control the timing and smoothness of movement in your GIF.
+ Focus on keyframes:
To create smooth and seamless animations, ensure that your keyframes are well-timed and positioned correctly.
+ Test different export settings:
It’s essential to experiment with different color palettes, frame rates, and transparency settings to find the optimal balance between visual quality and file size.
With these tips in mind, you’re well on your way to becoming a GIF export pro in After Effects. Unleash your creativity and bring your designs to life with captivating and shareable GIF animations. Enjoy the process and watch your visuals come alive with every loop!
Elevate Your Visual Content with After Effects GIF Export
Congratulations on completing our comprehensive guide on exporting GIFs from After Effects! By following these step-by-step instructions and implementing expert tips, you now possess the knowledge and skills to create mesmerizing GIF animations that will grab the attention of your audience.
Remember, exporting GIFs is not just about the technical process; it’s about creating engaging visuals that tell a story and evoke emotions. So, let your creativity run wild as you experiment with different color palettes, frame rates, and dithering options. Each GIF you export presents an opportunity to captivate and inspire your viewers.
As you continue to refine your skills, don’t forget to pay attention to the file size. Optimizing your GIFs for quick loading ensures a seamless and enjoyable viewing experience for your audience across various devices and platforms.
Now it’s time to put your newfound knowledge into action. Start exporting your stunning After Effects animations as GIFs and share them on websites, social media platforms, or even in your next email campaign. Stand out from the crowd and leave a lasting impression with your creative GIF creations.
Thank you for joining us on this journey to master GIF exporting in After Effects. We hope this guide has empowered you to unlock new possibilities for your visual content. Embrace your creativity and bring your ideas to life with captivating GIF animations. Happy exporting!

