How to Make Objects Disappear in After Effects
Introduction to Object Disappearance in After Effects
Have you ever wanted to create the illusion of an object disappearing right before your eyes? Whether for a film, commercial, or even a YouTube video, the ability to make objects vanish adds a touch of magic and excitement to your visuals. Adobe After Effects offers a range of tools and techniques to seamlessly achieve this effect.
In this guide, we’ll walk you through the step-by-step process of making objects disappear in After Effects. From using opacity animation for smooth fades to advanced features like masking and Content-Aware Fill, these methods will help you create a disappearing act that captivates your audience.
Step 1: Import Your Footage
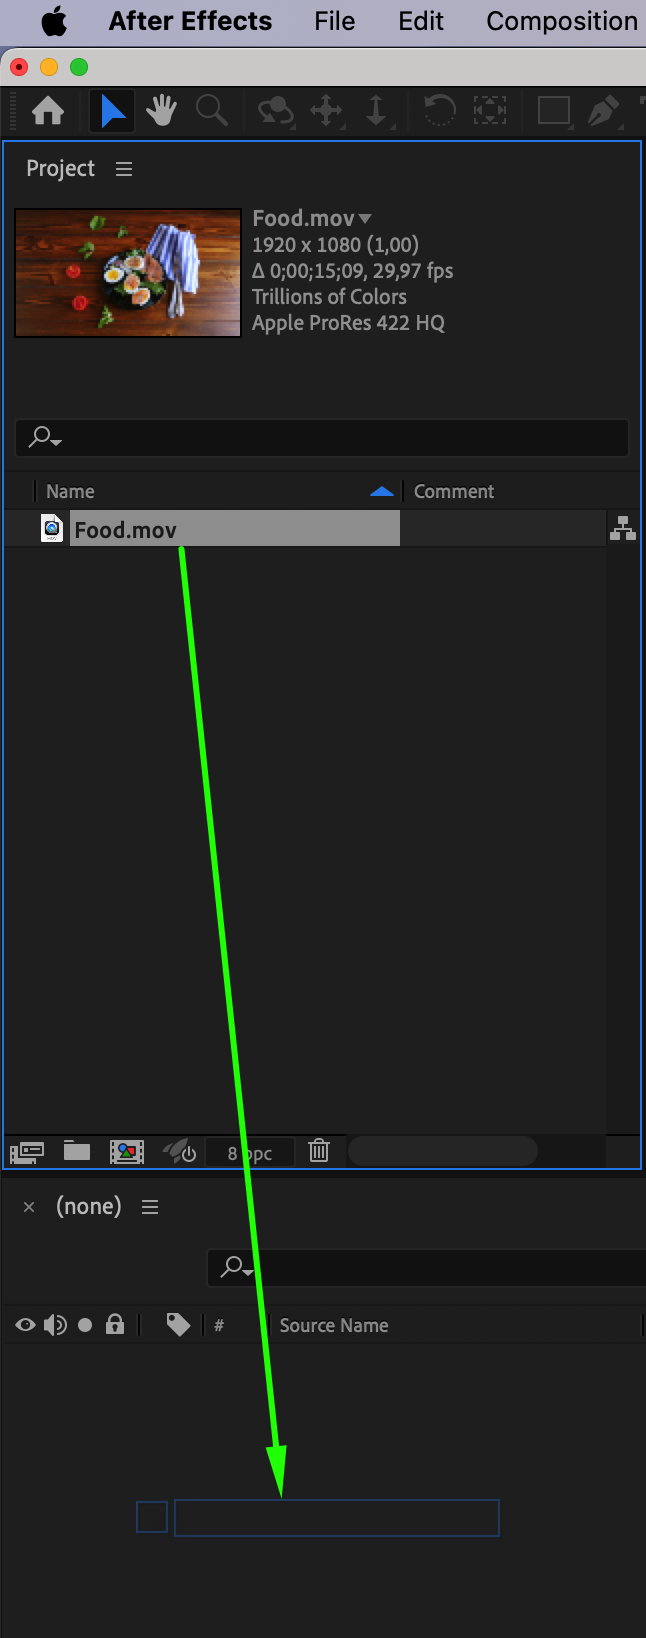
First, import your video footage by going to File > Import > File. Once the footage appears in the Project panel, drag it onto the timeline. This will be the video layer where you will apply all the effects to make the object disappear.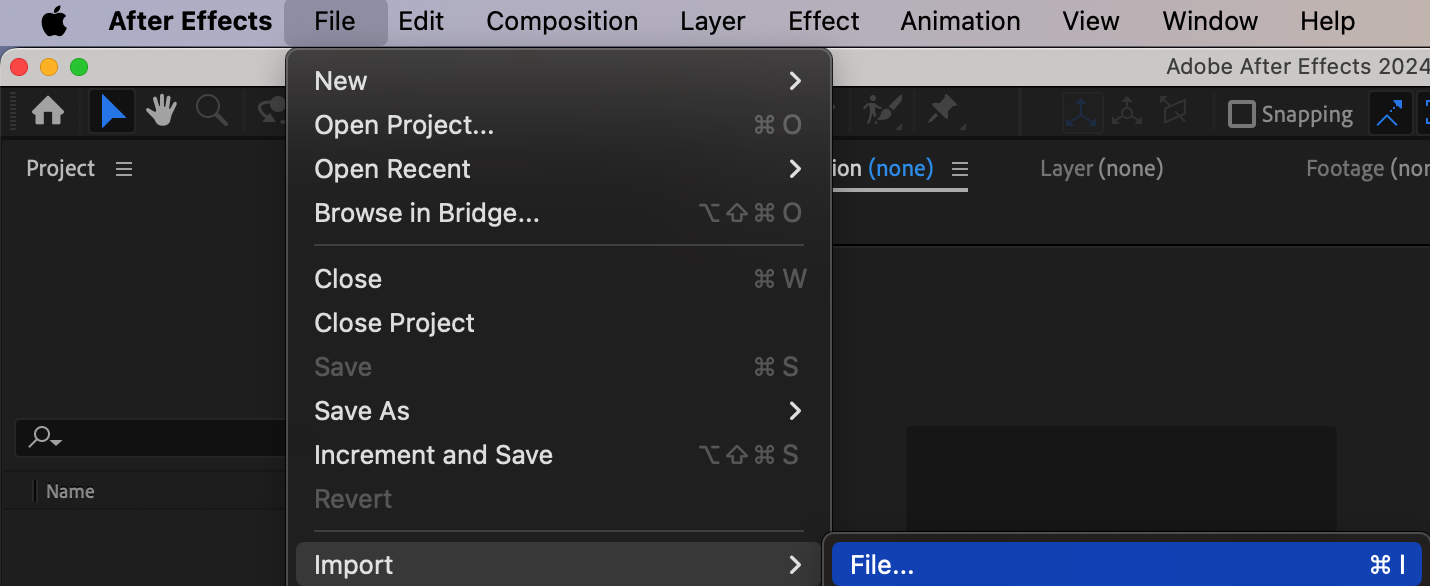
 Step 2: Create a Mask Around the Object
Get 10% off when you subscribe to our newsletter

To isolate the object you want to disappear, use the Pen Tool (G) from the toolbar to draw a mask around it. Carefully trace the object by clicking around its edges, forming a path. This mask will define the area you want to manipulate in the following steps.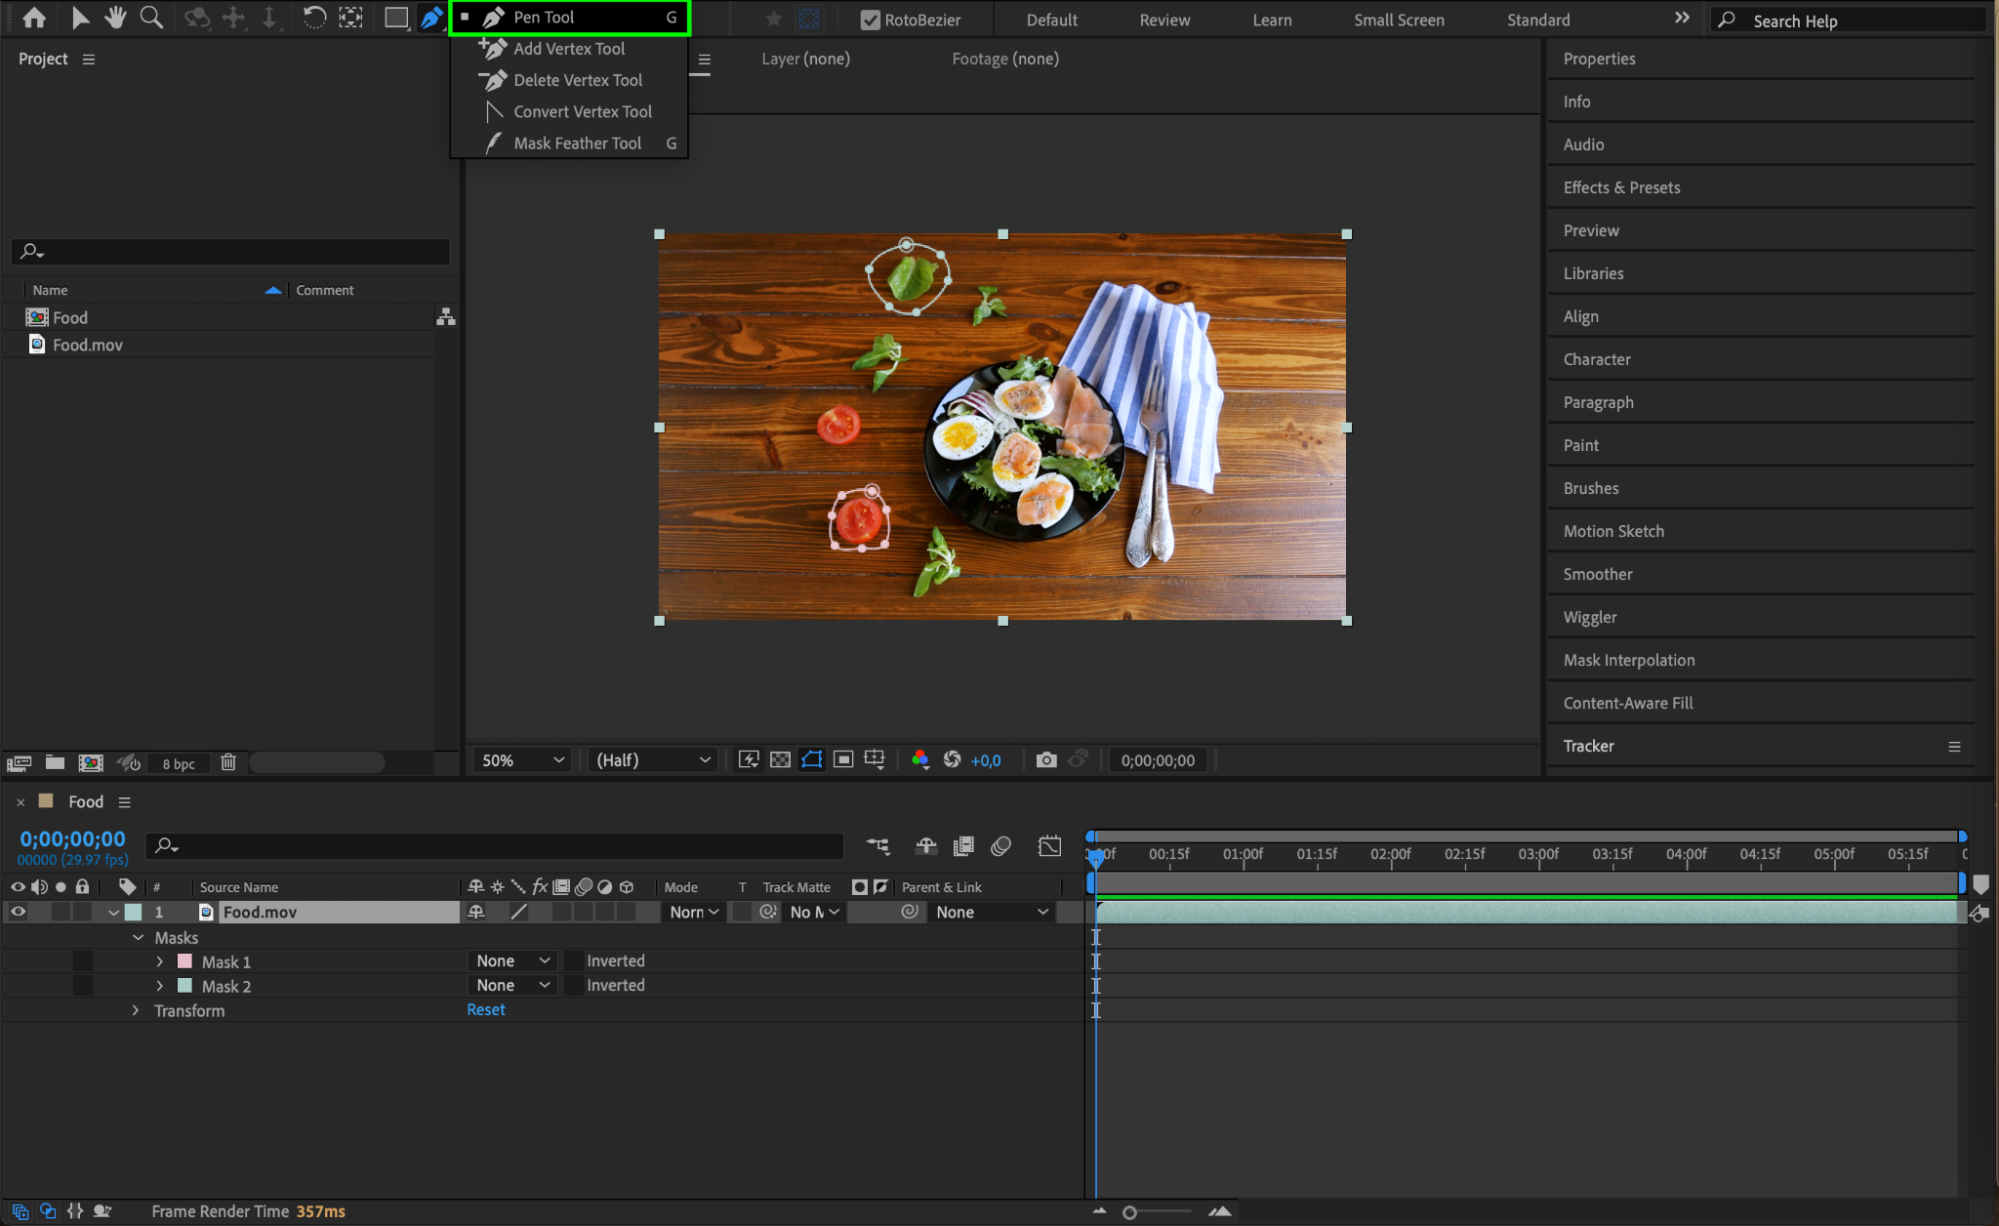 Step 3: Track the Mask
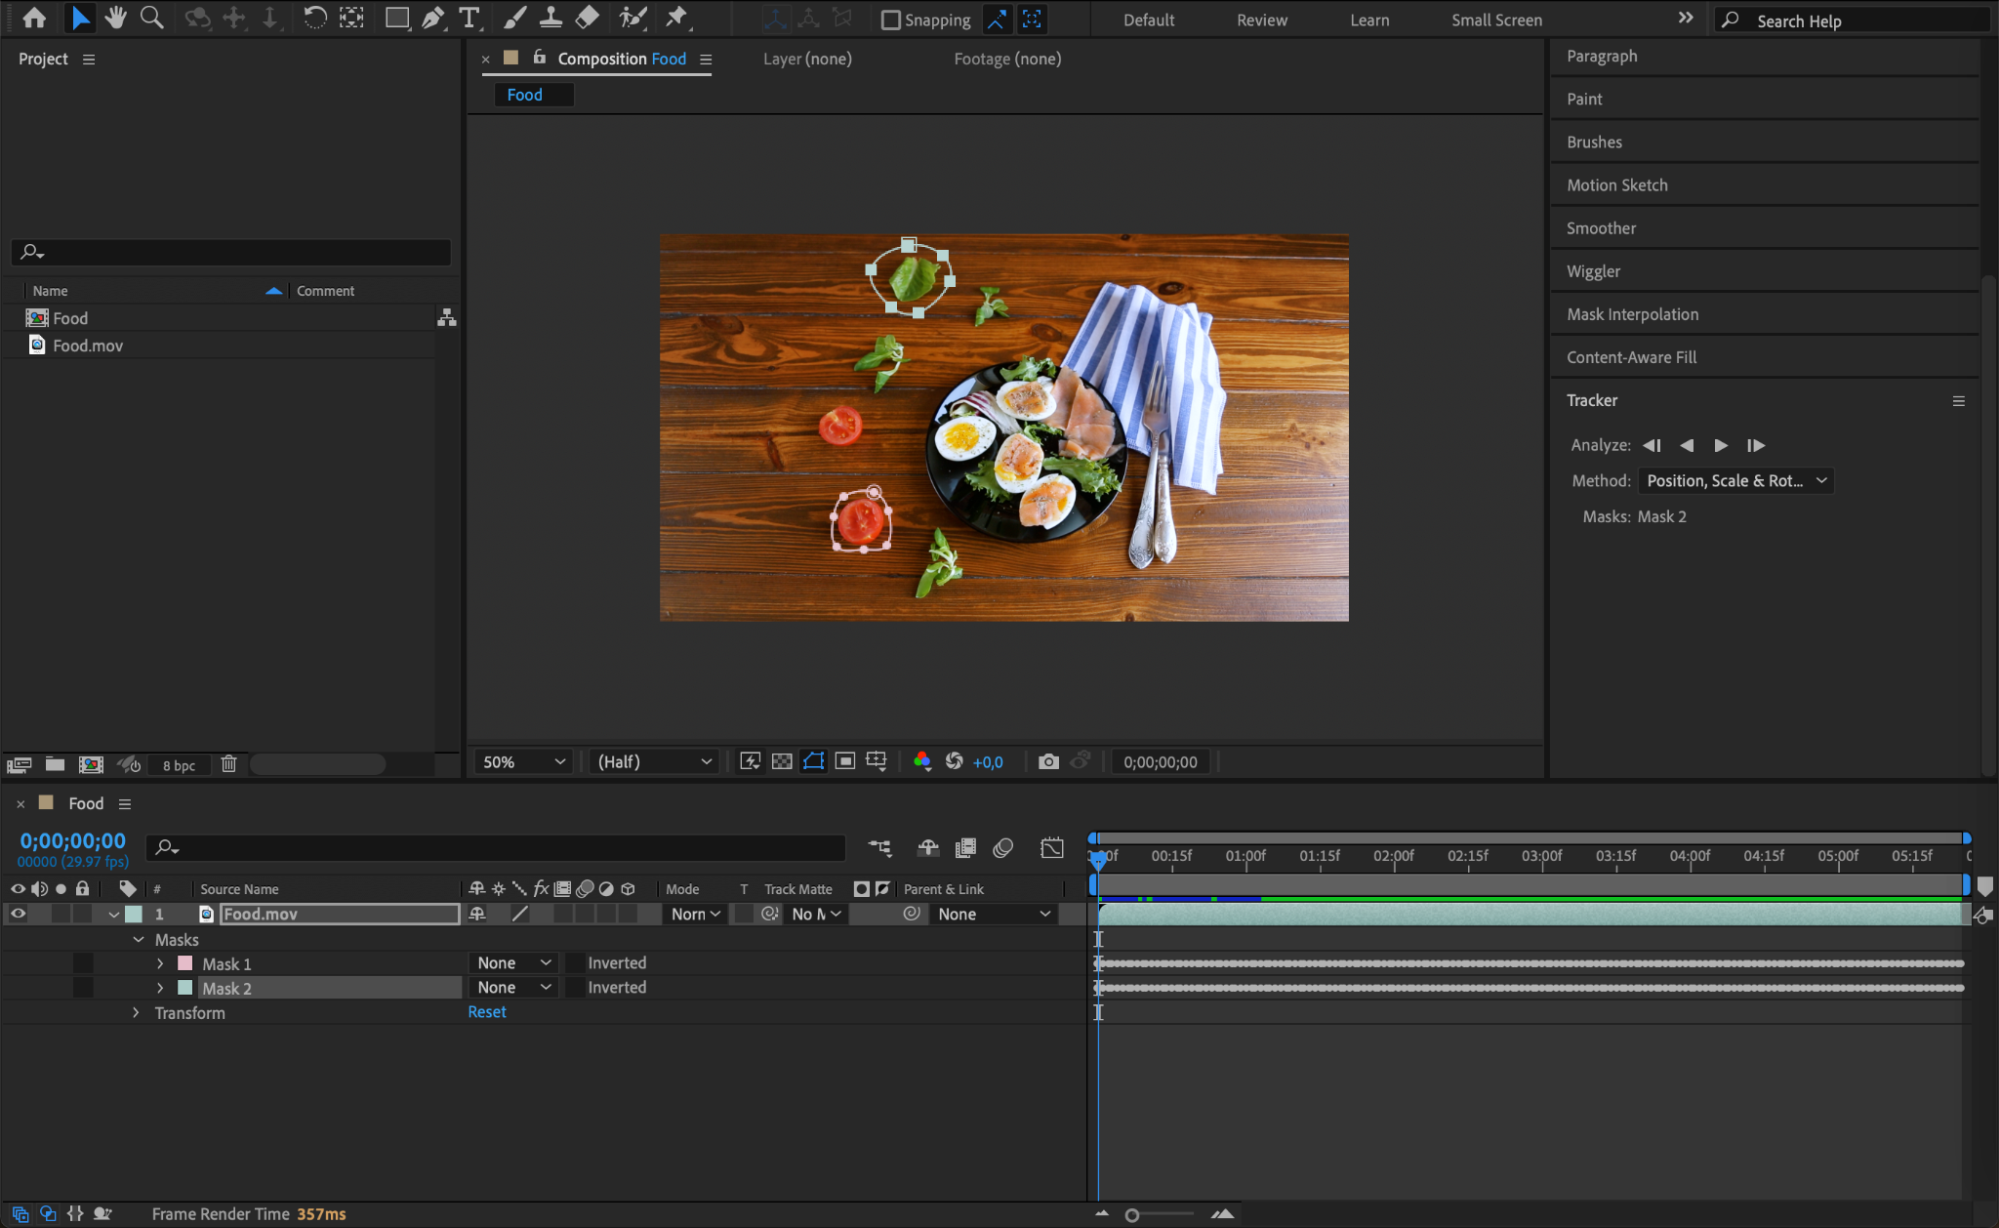
Once the mask is created, right-click on the mask and select Track Mask from the submenu. This option enables the mask to follow the object’s movement throughout the footage, ensuring the disappearing effect remains consistent as the object moves.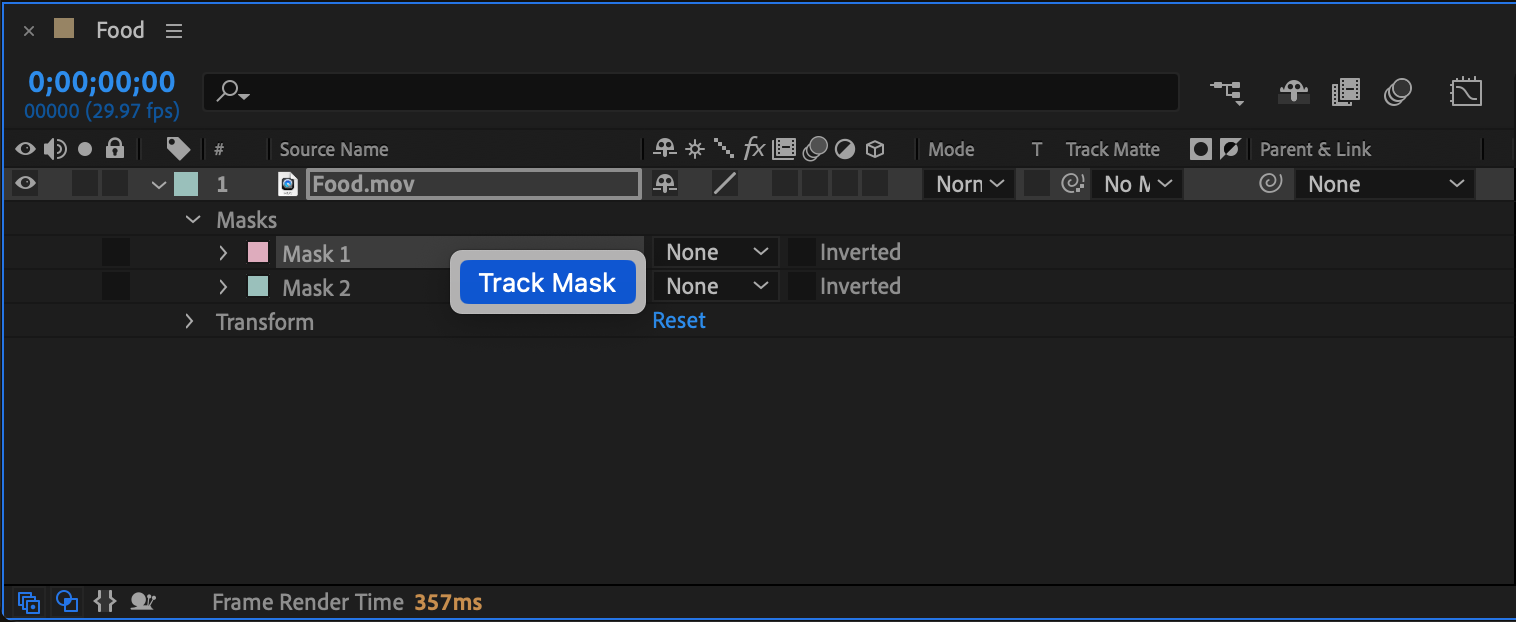 Step 4: Start Mask Tracking
In the Tracker Panel, press the Play button under the Analyze section to start tracking the object. After Effects will then automatically generate keyframes for the Mask Path parameter, allowing the mask to follow the object’s movement throughout the video. Once tracking is complete, review the keyframes to ensure the mask aligns correctly with the object before proceeding.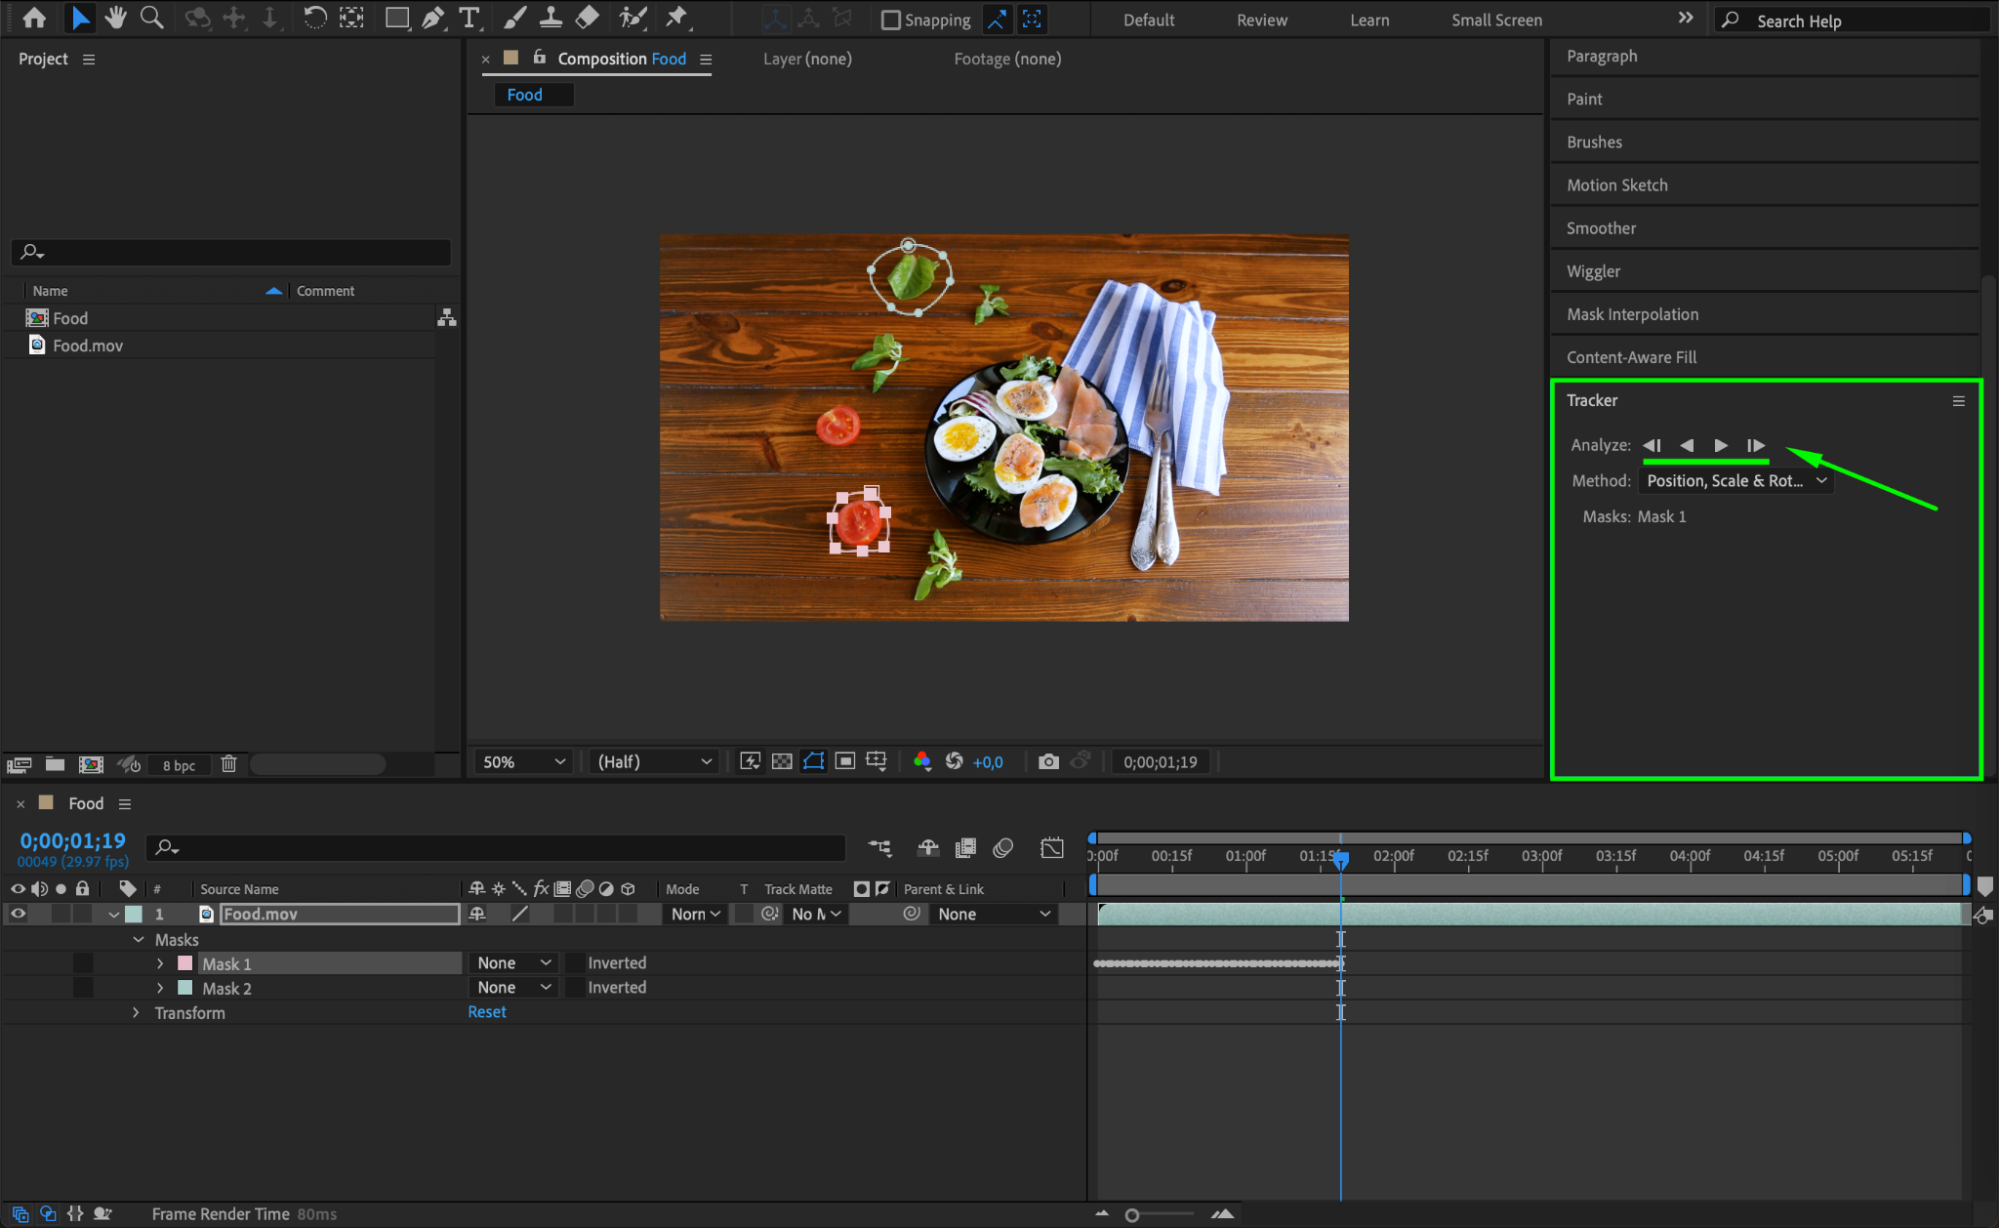
 Step 5: Set the Mask Mode to Subtract
For each created mask, go to the mask settings and change the Mode to Subtract. This will invert the mask, hiding the object within the selected area. This step is key to making the object vanish.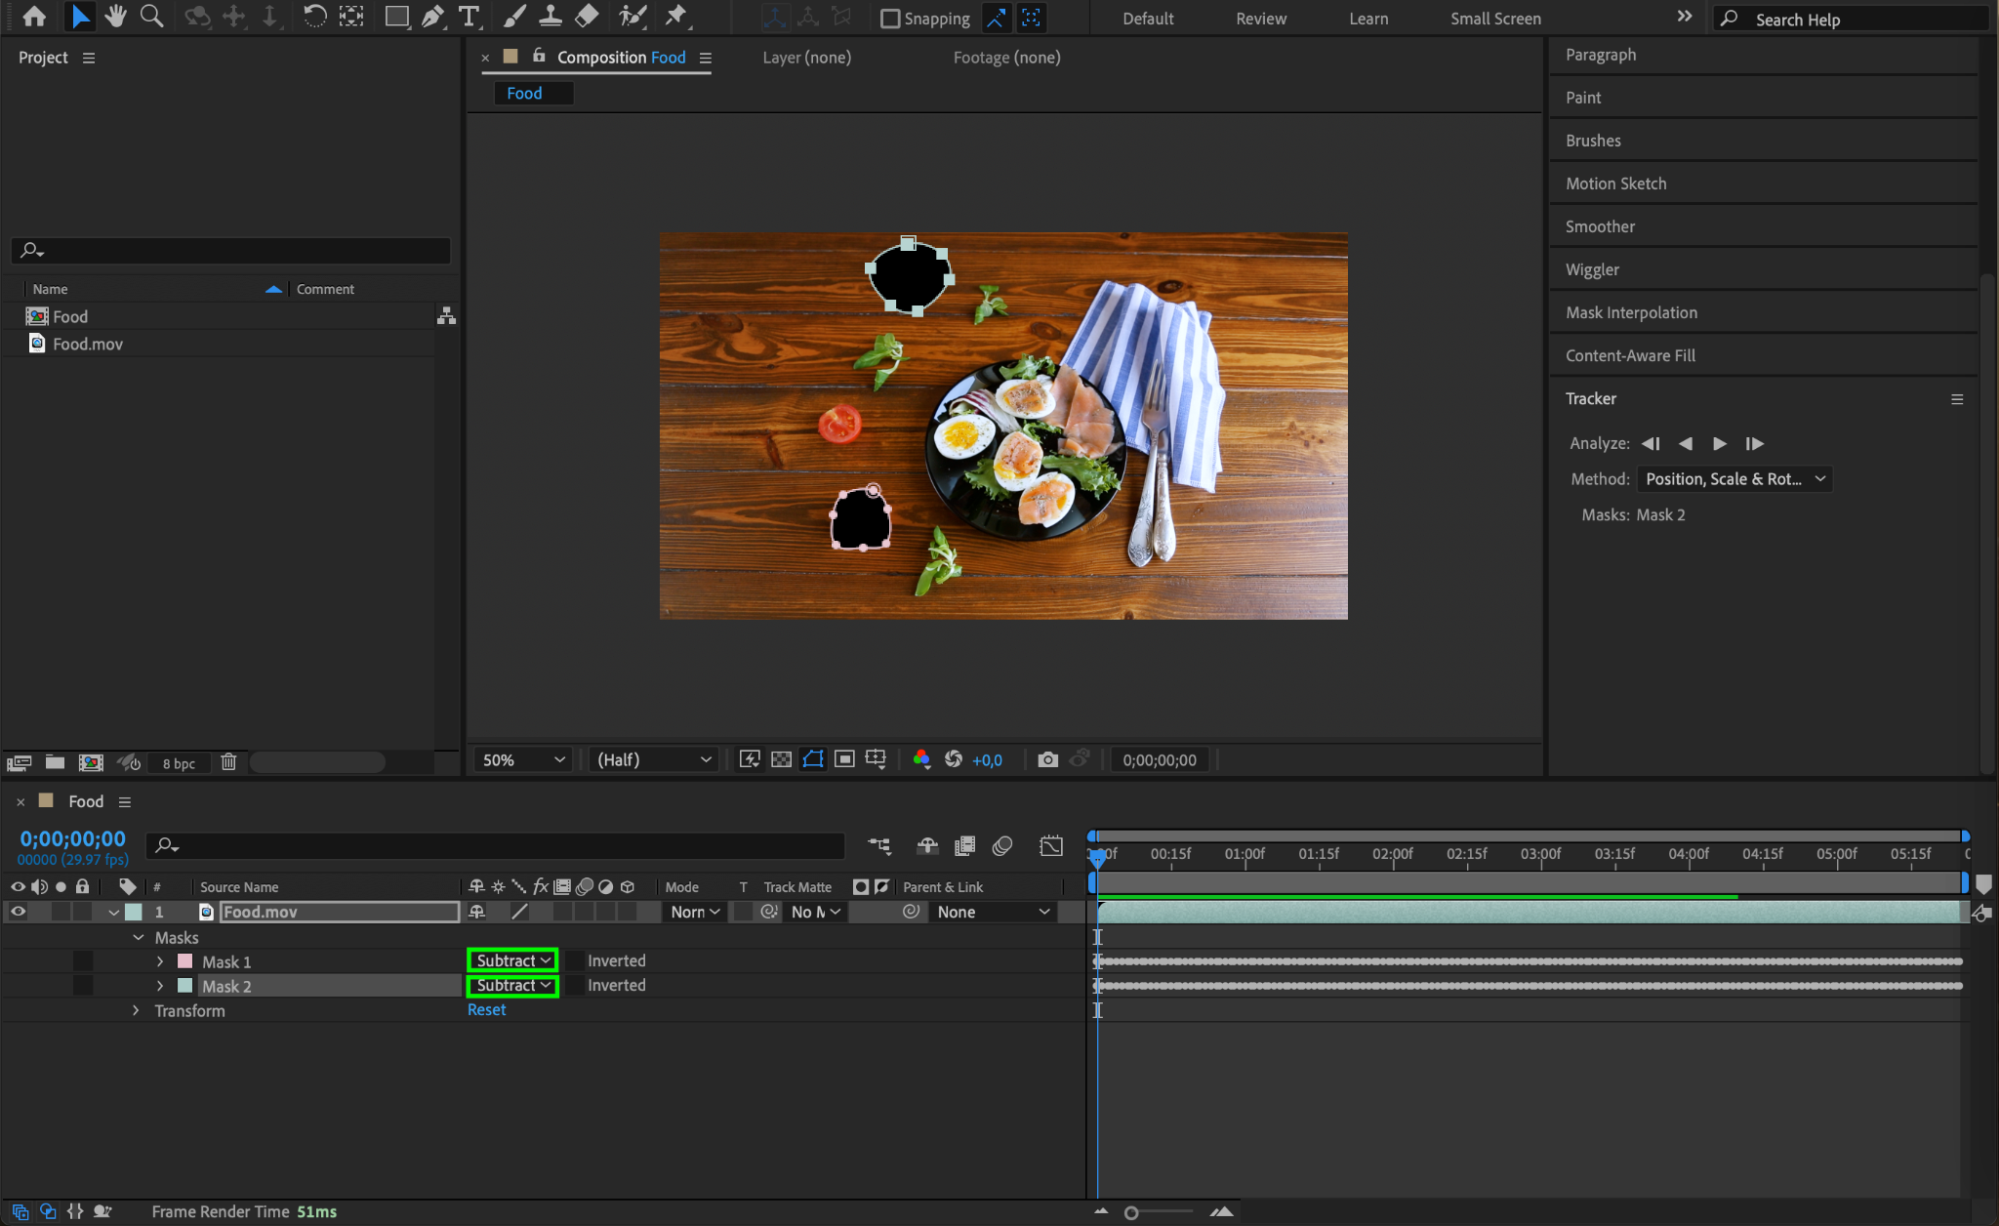 Step 6: Open the Content-Aware Fill Panel
Go to the Window menu and select Content-Aware Fill to open the panel. This tool will fill in the area where the object was, creating a smooth background replacement. It’s an advanced technique that simplifies the removal of elements from your footage.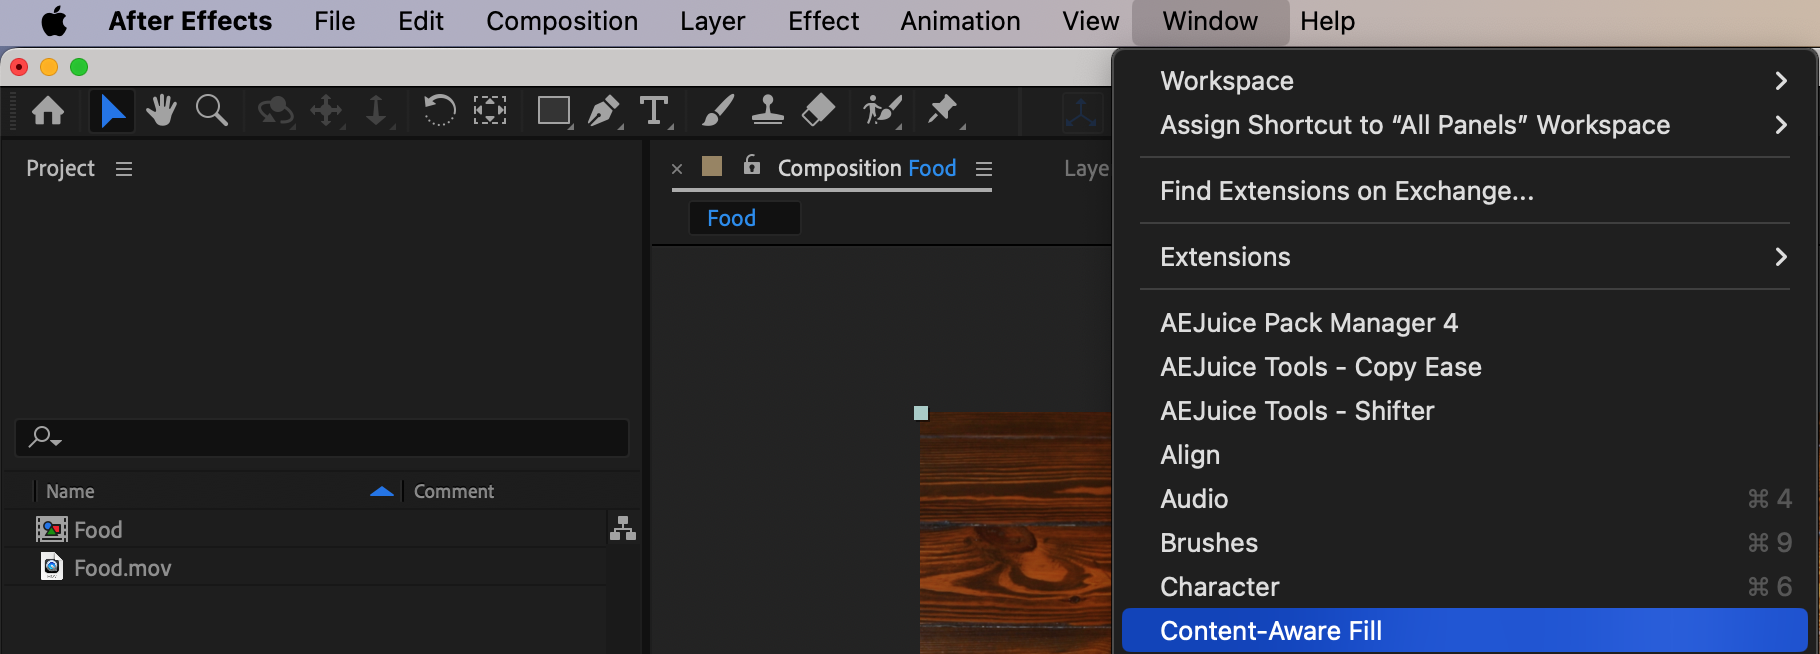 Step 7: Adjust Content-Aware Fill Settings
In the Content-Aware Fill panel, set the following parameters:
Alpha Expansion: 64
Fill Method: Object
Range: Work Area
Once you’ve configured these settings, press the Generate Fill Layer button. After Effects will analyze the footage and generate a new layer that seamlessly fills the area where the object was.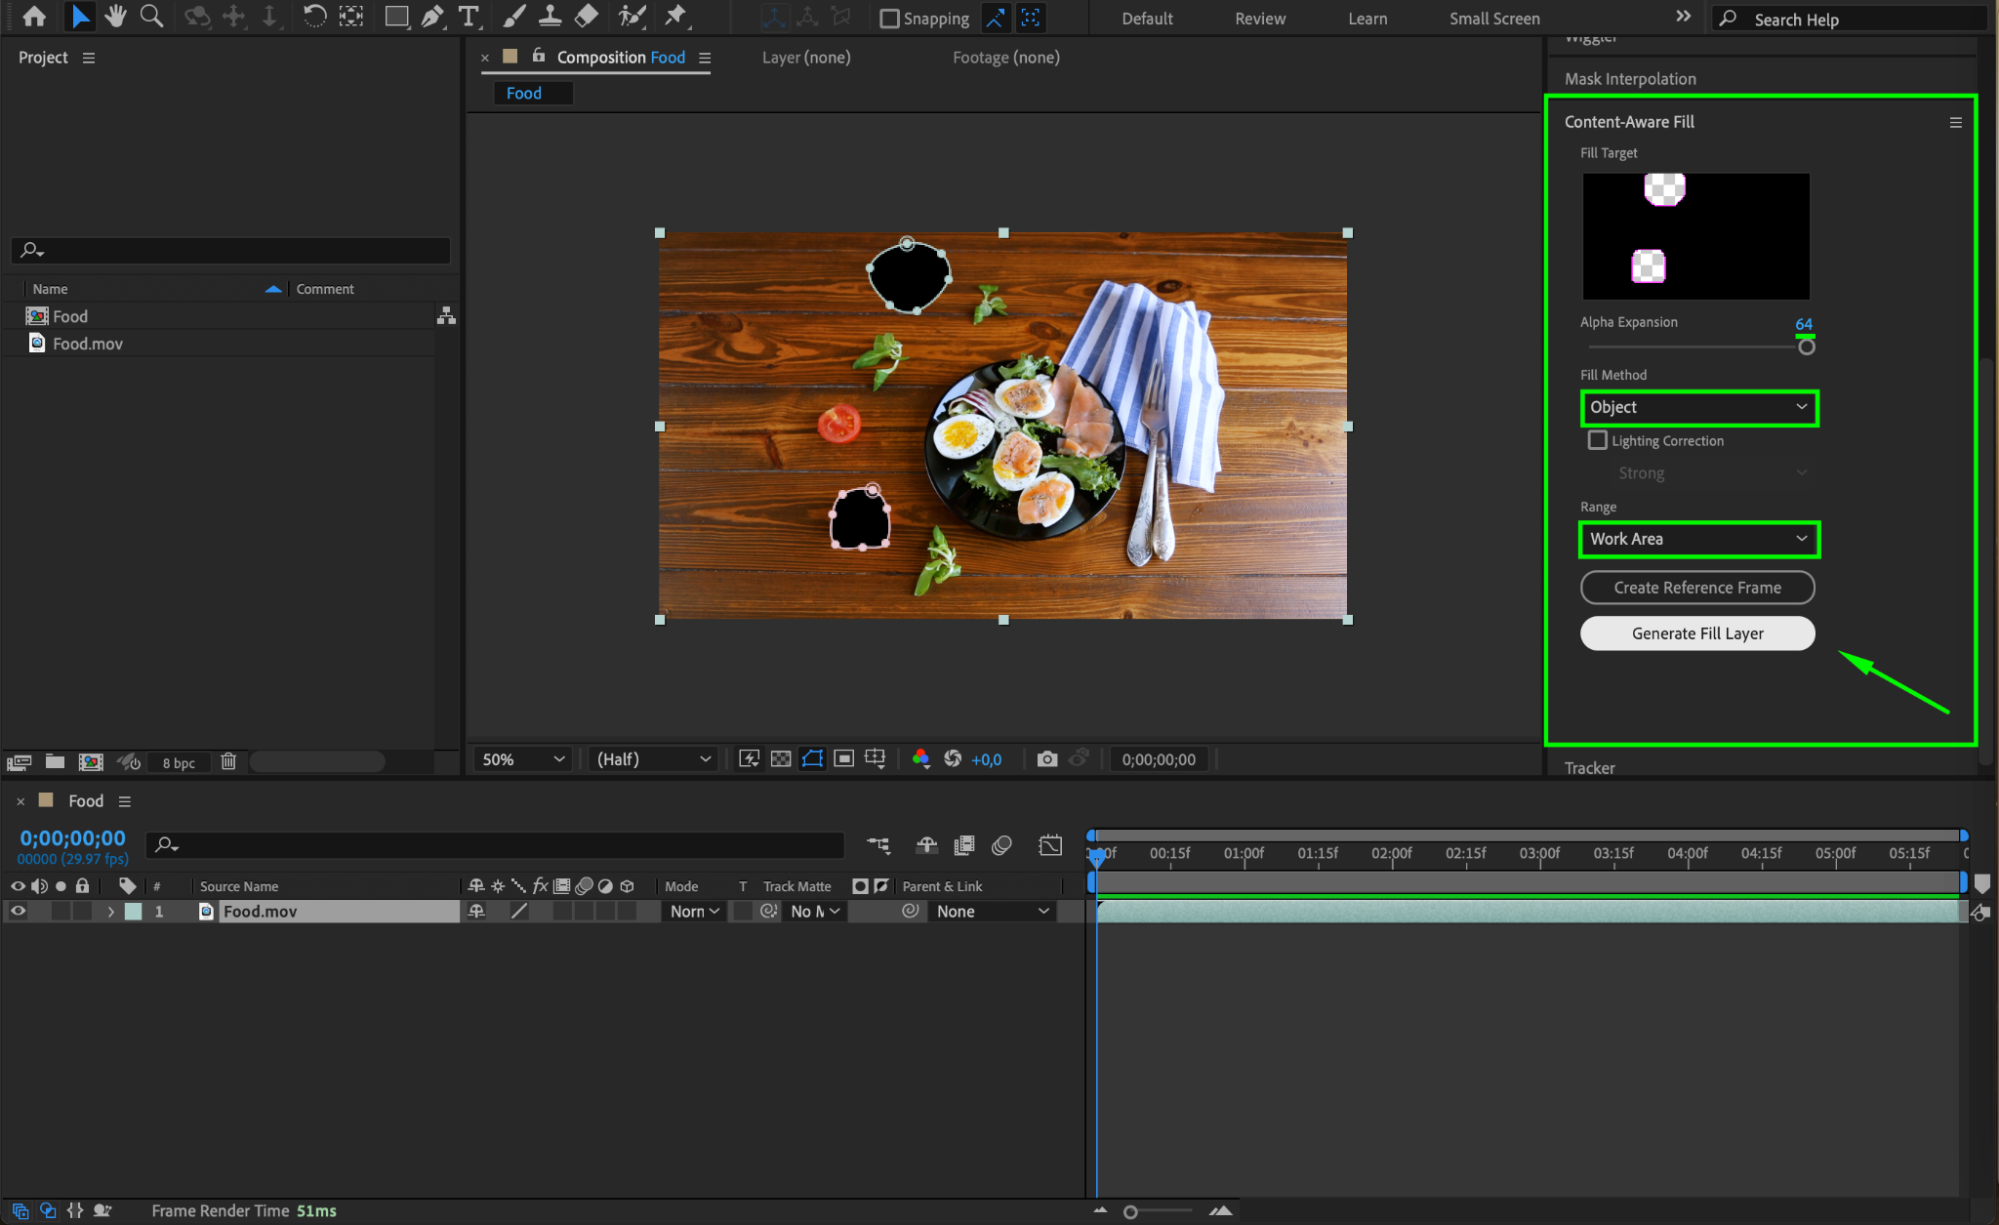 Step 8: Pre-Compose the Fill Layer
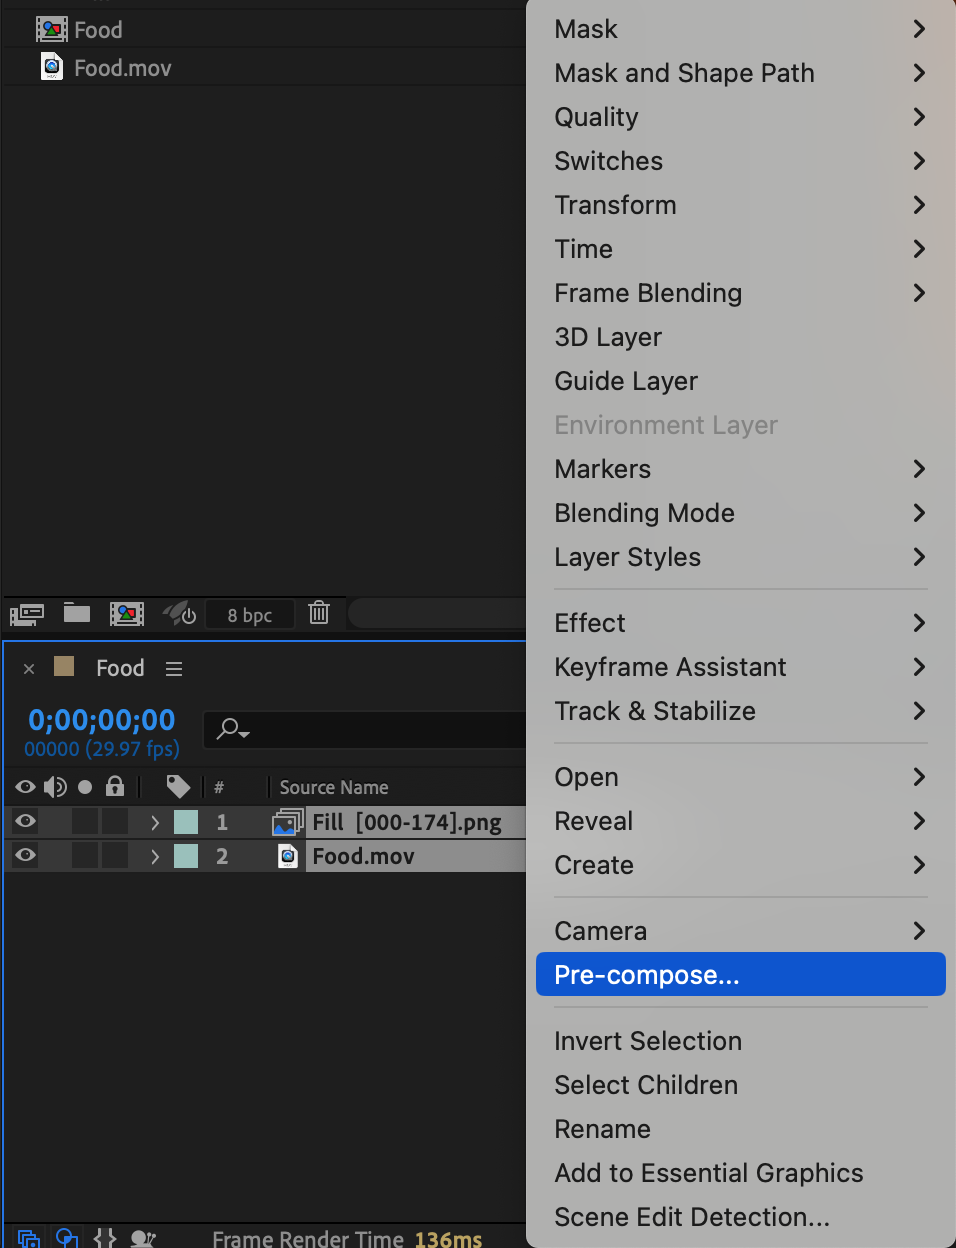
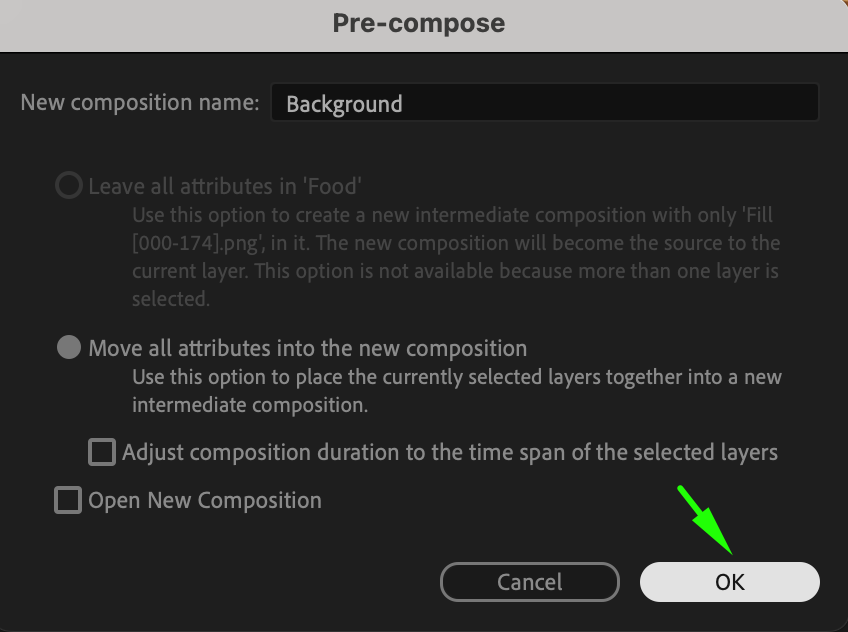
Select both the Fill Layer and the original Video Layer in the timeline, right-click, and choose Pre-compose. Name this composition “Background.” Pre-composing helps organize your layers and makes further editing simpler.
 Step 9: Add the Original Footage on Top
Drag the original footage back from the Project panel onto the timeline, placing it above the pre-composed layer. This step reintroduces the video without affecting the object disappearance effect you’ve just created.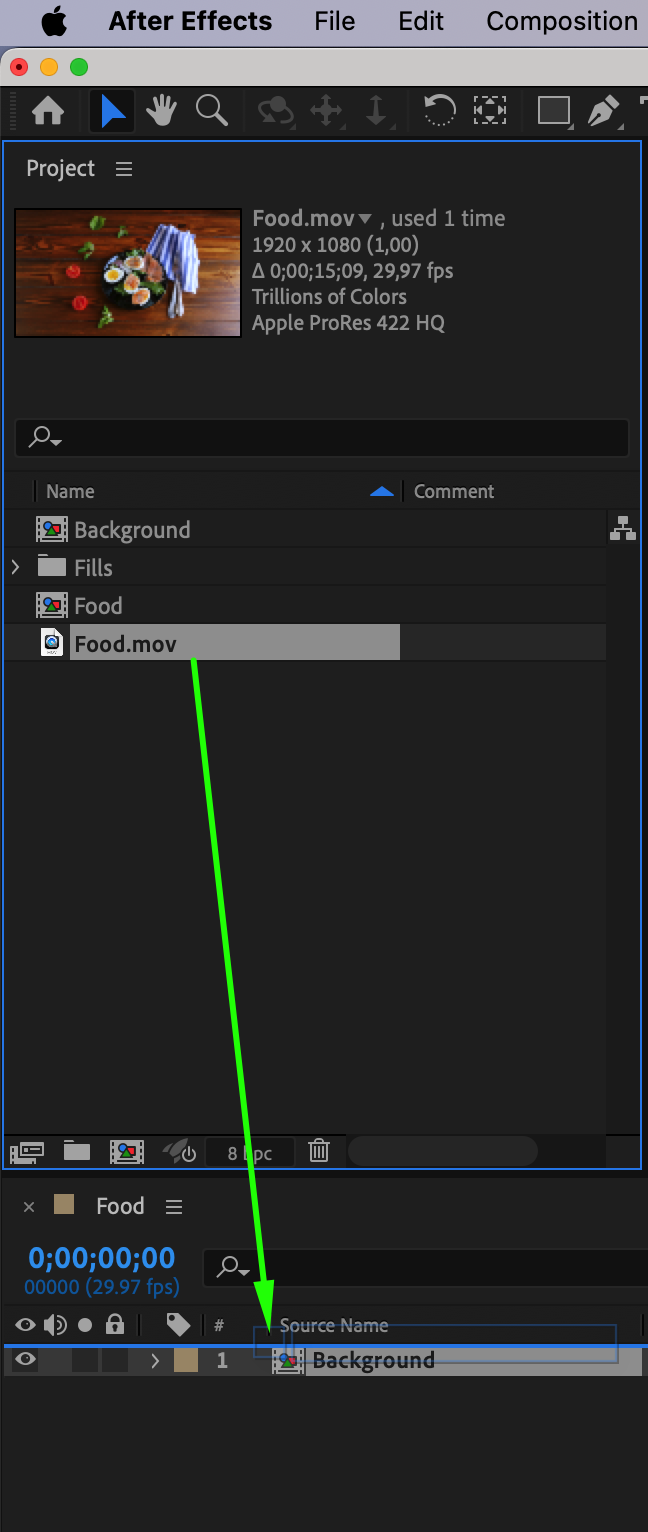 Step 10: Animate Opacity to Make the Object Disappear
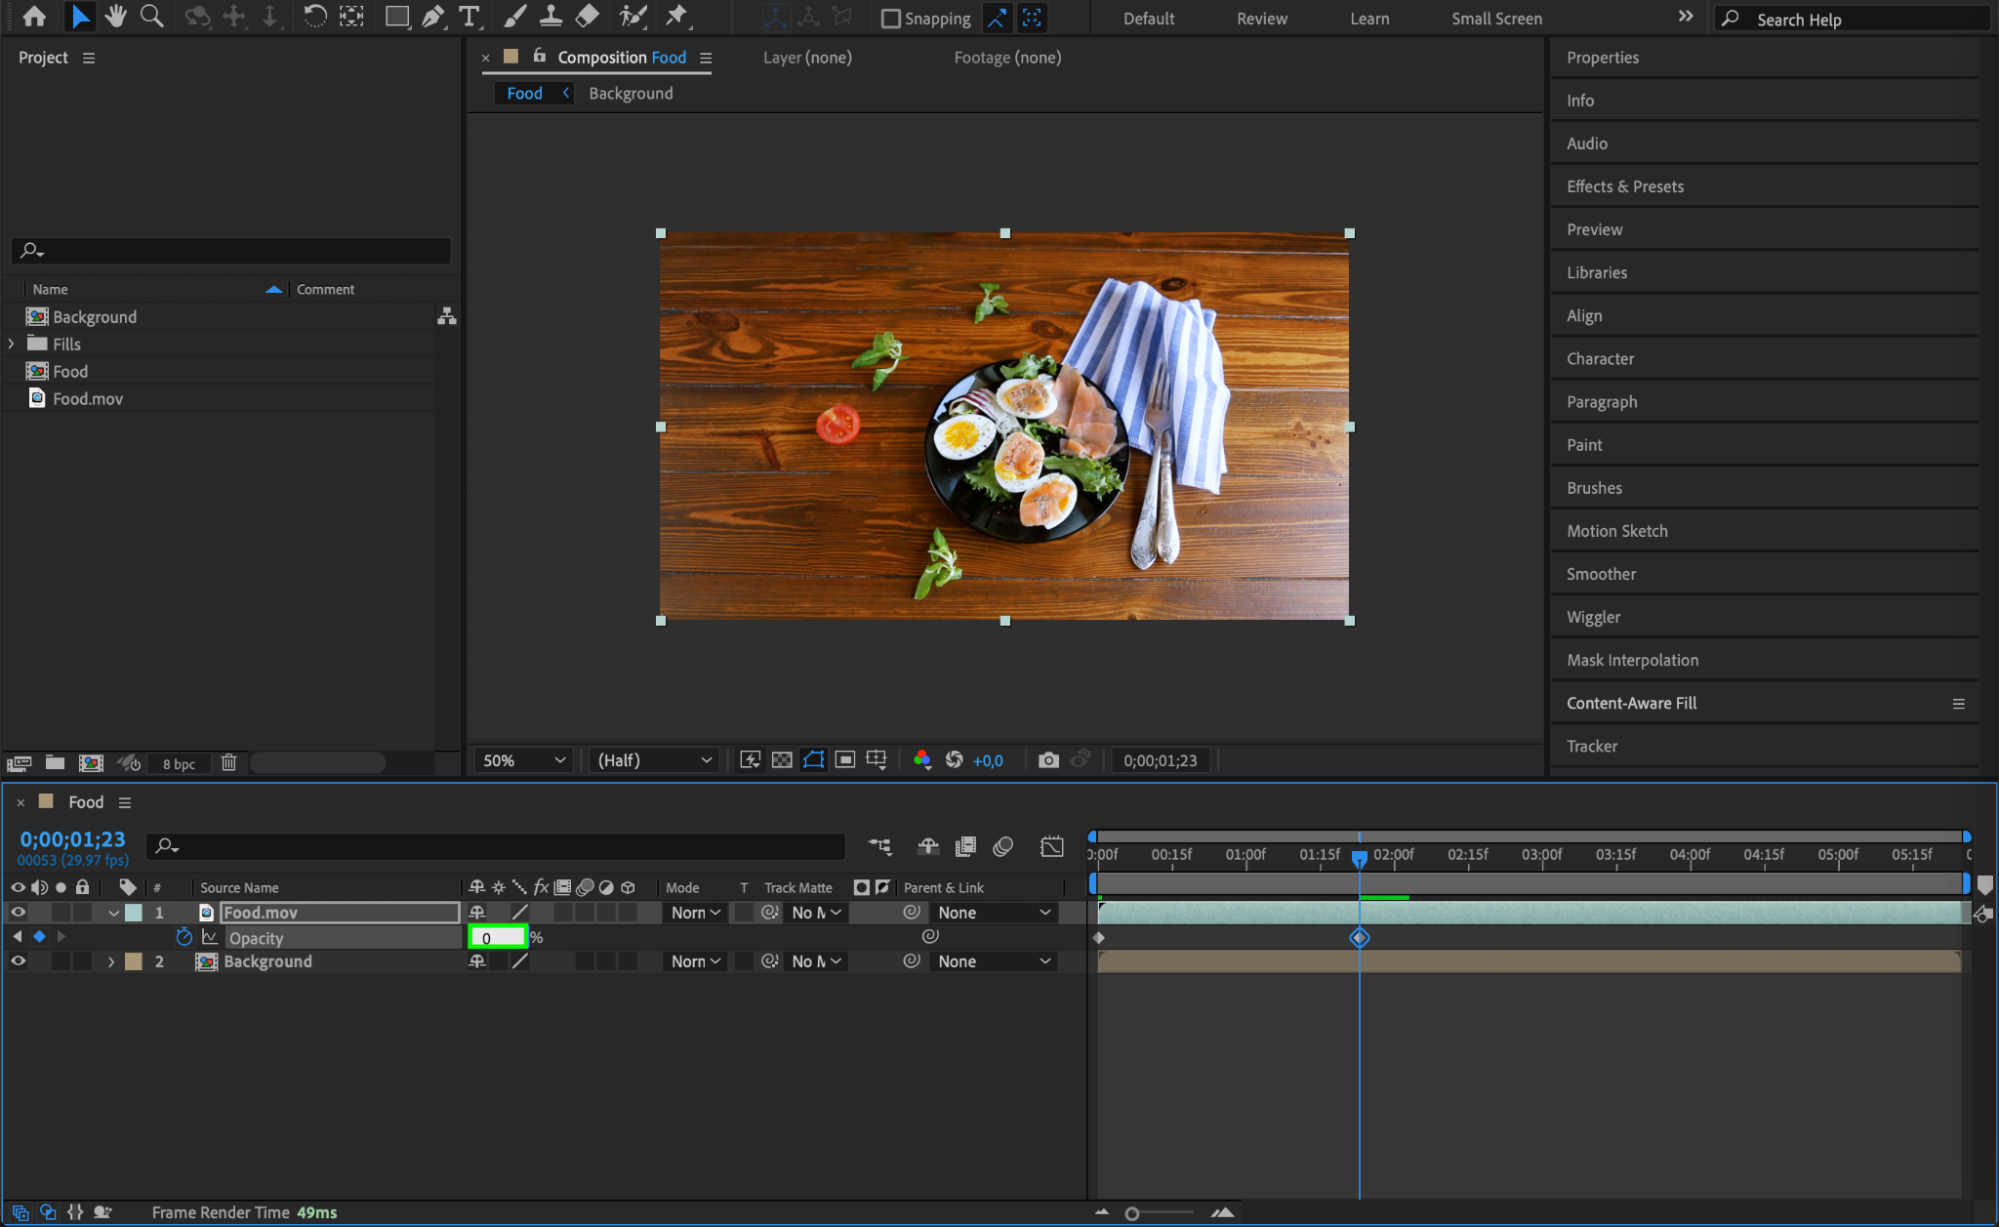
Select the re-imported footage and press “T” on your keyboard to bring up the Opacity settings. Create a keyframe at the beginning of the composition, or at the point where you want the object to start disappearing, by setting the Opacity to 100%. Then, move the CTI (Current Time Indicator) to the moment when the object should fully disappear and change the Opacity to 0%. This will create a smooth fade-out effect that complements the previous steps.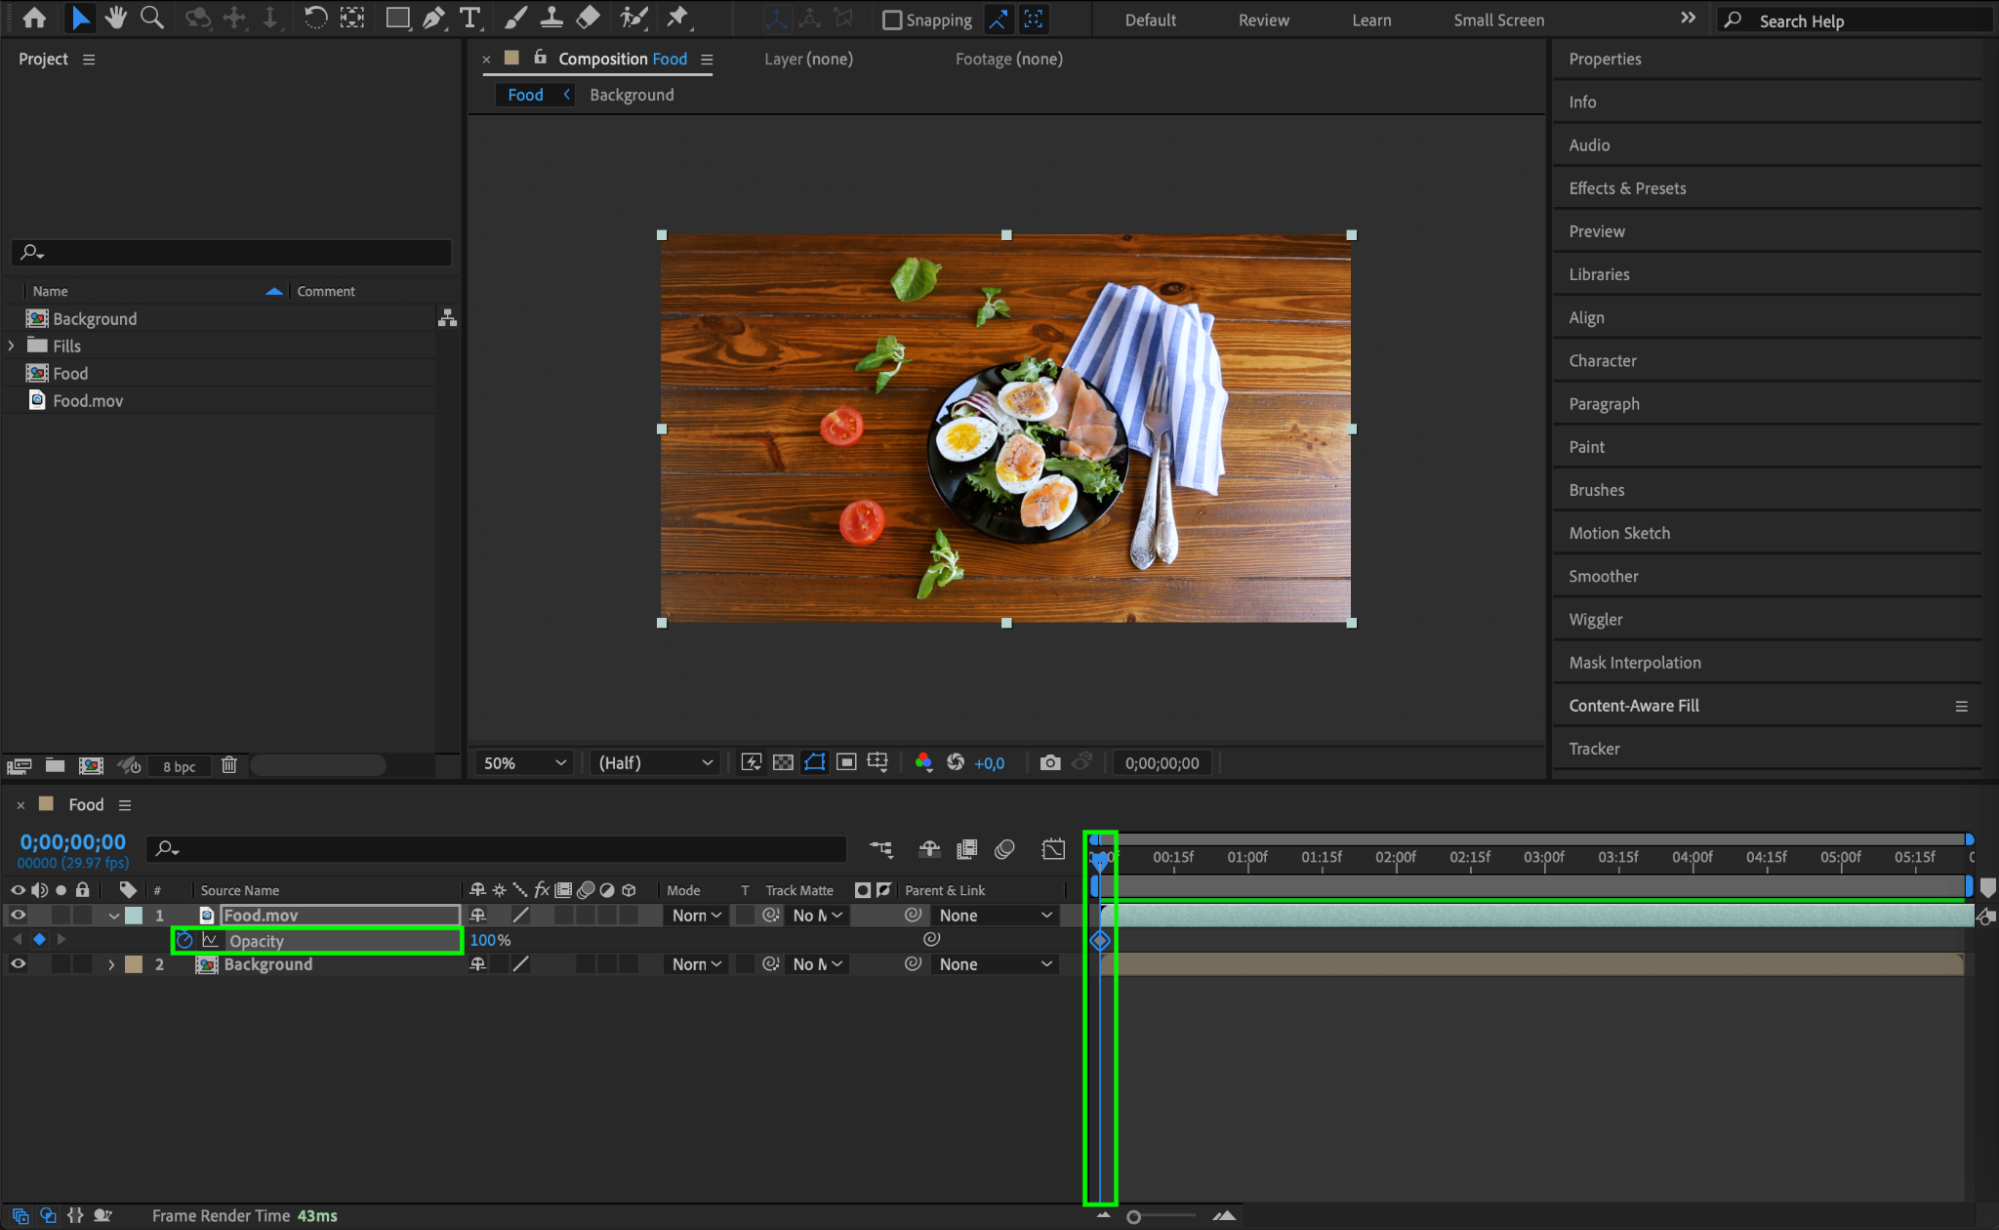
 Step 11: Preview the Disappearance
Now, press the Spacebar to preview your composition. Watch as the object smoothly disappears from the scene, thanks to the combined effects of masking, tracking, and opacity animation. Adjust any settings if needed to perfect the timing and smoothness.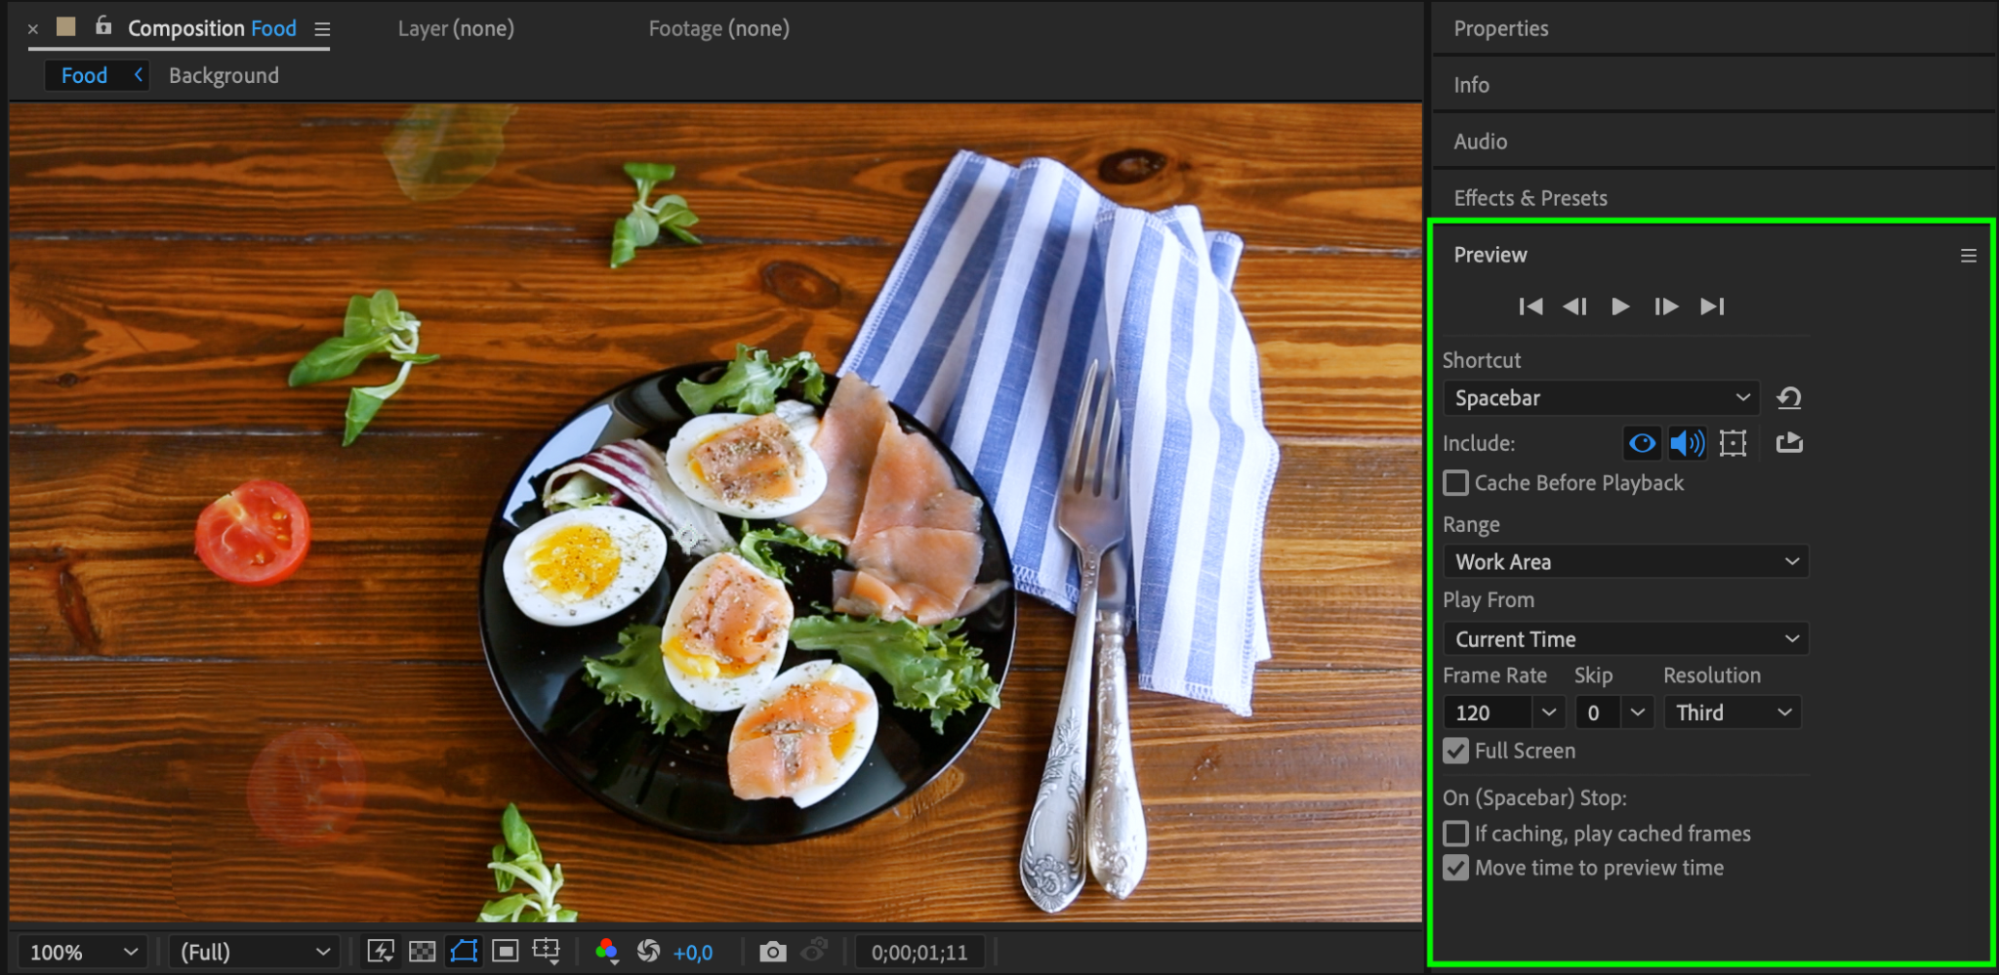 Conclusion
In conclusion, making objects disappear in After Effects is an essential skill for any video designer. By mastering techniques like opacity video layer, masking, tracking, and utilizing advanced tools like Content-Aware Fill, you can create visually stunning disappearances that will captivate your audience. So, don’t be afraid to experiment and push your creative boundaries – the possibilities are endless in After Effects!
Are you ready to make objects vanish and unleash your creativity? Stay tuned for our upcoming tutorials where we’ll dive deeper into these techniques and showcase even more exciting ways to create the illusion of vanishing objects in After Effects. Happy disappearing!


