The Ultimate Guide on How to Render Pictures in After Effects
Introduction: Unlocking the Power of Picture Rendering in After Effects
Are you an aspiring motion graphics artist or a seasoned After Effects user? If so, you’ve probably discovered the incredible potential that this software offers for creating stunning visual effects and animations. While After Effects is widely revered for its ability to bring videos to life, it also excels in rendering high-quality pictures that can rival the work of professional photographers.
In this in-depth guide, we will explore the process of rendering pictures in After Effects, empowering you to harness the full potential of this versatile software. Whether you want to showcase your artwork, create captivating social media posts, or simply enhance the visuals of your projects, understanding how to render pictures effectively is crucial.
Rendering pictures in After Effects goes beyond just exporting a static frame; it involves optimizing various settings to ensure the best quality and performance. With our step-by-step approach, we’ll take you through all the necessary stages, from choosing the right composition settings to configuring the output parameters.
Get 10% off when you subscribe to our newsletter

But why should you use After Effects to render your pictures? The answer lies in its advanced features and tools specifically crafted to produce visually stunning results. From applying intricate effects and color grading to manipulating layers and compositions, After Effects offers unparalleled creative control to elevate your pictures to new heights.
Whether you are looking to create pixel-perfect still images or explore innovative motion graphics design, this guide will equip you with the know-how to render pictures in After Effects with precision and finesse. Along the way, we’ll share expert tips and techniques, highlight useful plugins and presets, and address common challenges that users face during the rendering process.
Get 10% off when you subscribe to our newsletter
Join us on this journey where we’ll dive deep into the intricacies of rendering pictures in After Effects, demystifying the complexities and empowering you to unleash your creative vision on digital canvas. So, let’s get started and unlock the power of picture rendering in After Effects!
Tips and Tricks to Streamline Picture Rendering in After Effects
To ensure a smooth and efficient picture rendering process in After Effects, it’s important to follow some best practices and utilize helpful techniques. Here are some valuable tips to help you optimize your workflow and achieve stunning results:
Get 10% off when you subscribe to our newsletter
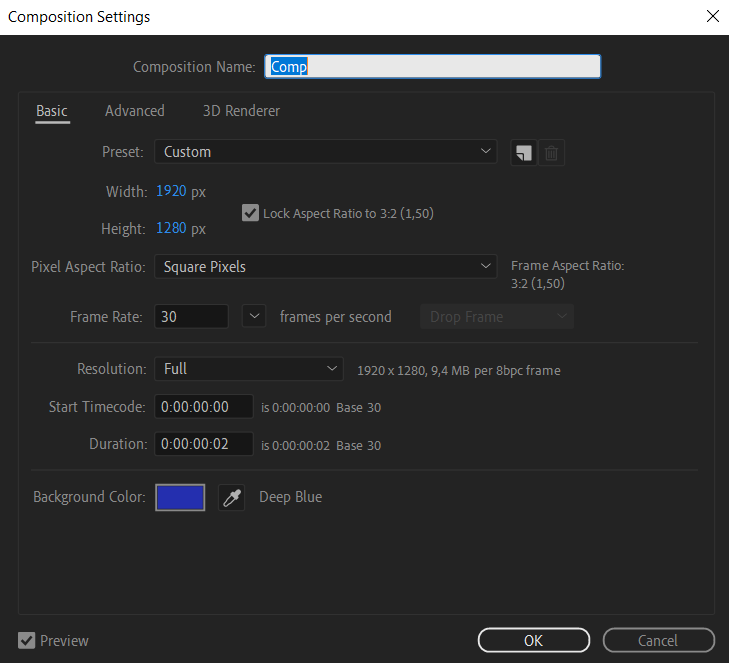
1. Composition Settings: Before diving into the rendering process, make sure your composition settings are properly configured. Set the resolution and frame rate according to your specific requirements. 
Get 10% off when you subscribe to our newsletter
Quick tip: Press Ctrl/Cmd + K to open the Composition Settings dialog box, where you can adjust these parameters.
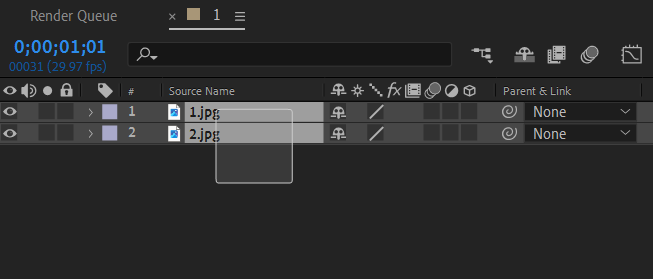
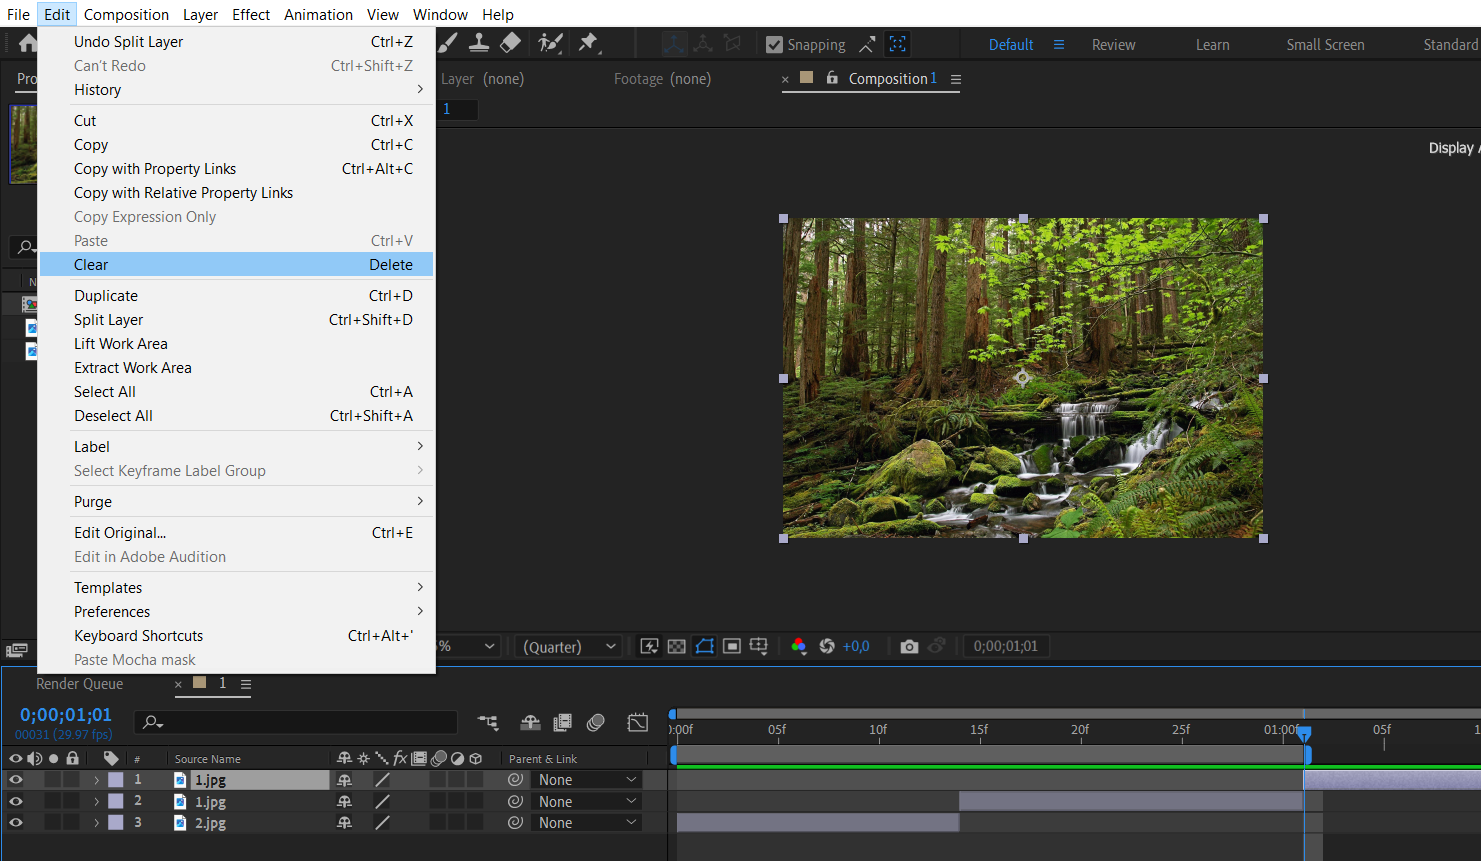
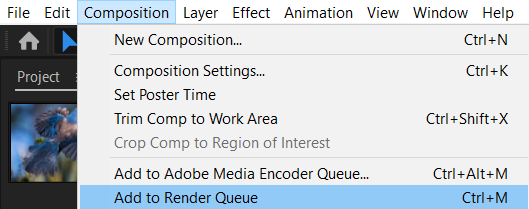
2. Add to Render Queue Option
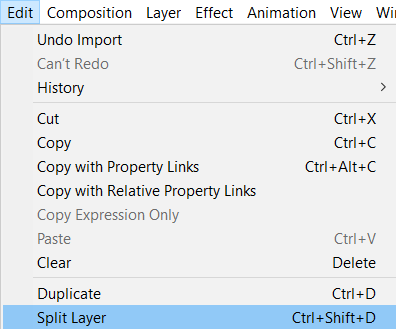
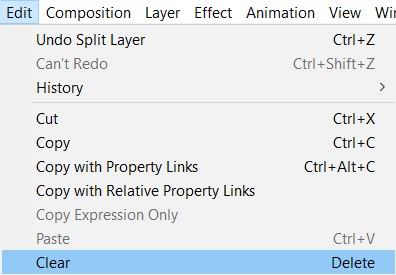
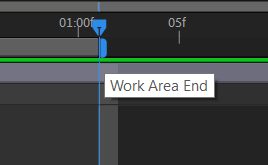
To render in After Effects, begin by trimming the working area to match the composition’s end. View the total duration and enhance the look using Split Layer (Ctrl/Cmd + Shift + D). Eliminate unwanted segments with the Delete key. Go to the Composition tab and select “Add to Render Queue” or use Ctrl/Cmd + M. Access Output Module Settings to configure format, codec, and export options. Experiment with formats and codecs to achieve an optimal balance between quality and file size.
Get 10% off when you subscribe to our newsletter


3. Best Settings Option
A new tab will appear alongside the “New” сomposition tab. To ensure optimal compatibility, select the “Best Settings” option adjacent to the render settings menu. This helps achieve the most suitable format for your project.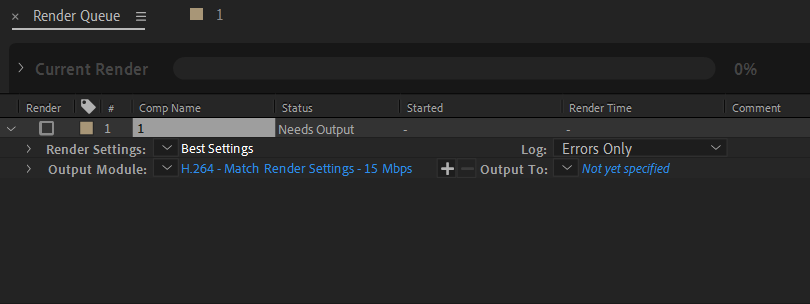
4. Adjust the Render Settings
Upon opening the render settings window, adjust the quality to the highest, set the resolution to full, and configure the disk cache to “read.” These settings are crucial for advancing in the After Effects rendering process. Additionally, opt for “on for checked layers” in the frame blending menu, while leaving the remaining options unchanged.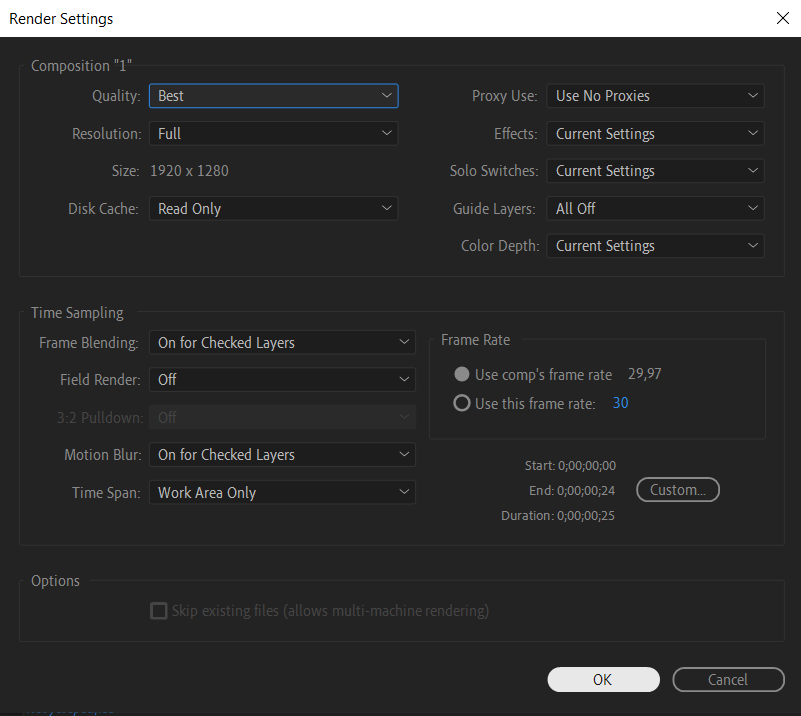
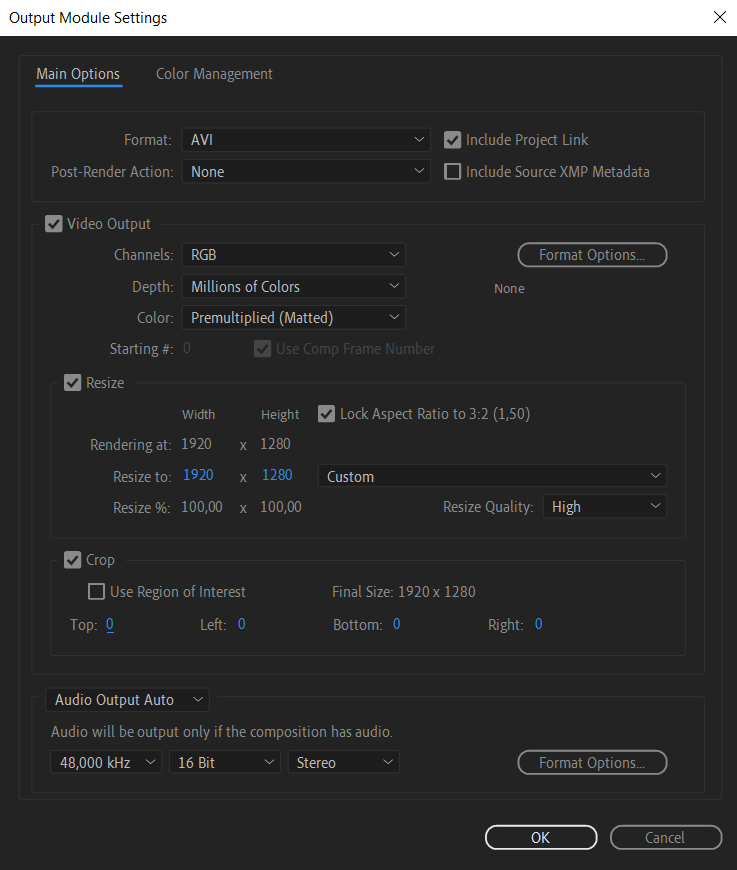
5. Adjust Output Module Settings
After completing the previous steps, click “OK.” Proceed to the output module and select “Lossless” next to it. Expand the format menu and choose a format compatible with your playback device. Navigate to the format option to select a video codec for compression; however, for this tutorial, no video codec will be chosen to maintain optimal output quality. Adjust video dimensions manually or with provided presets. The crop option allows removal of unwanted areas, and audio output settings enable frequency customization.
Get 10% off when you subscribe to our newsletter

6. Change settings for Color Management
Navigate to the Color Management tab and check the box labeled “Preserve RGB” if you prefer a desaturated appearance for your video. Uncheck the option if you want the output to retain its color. Double-check the settings and then click “OK” to confirm.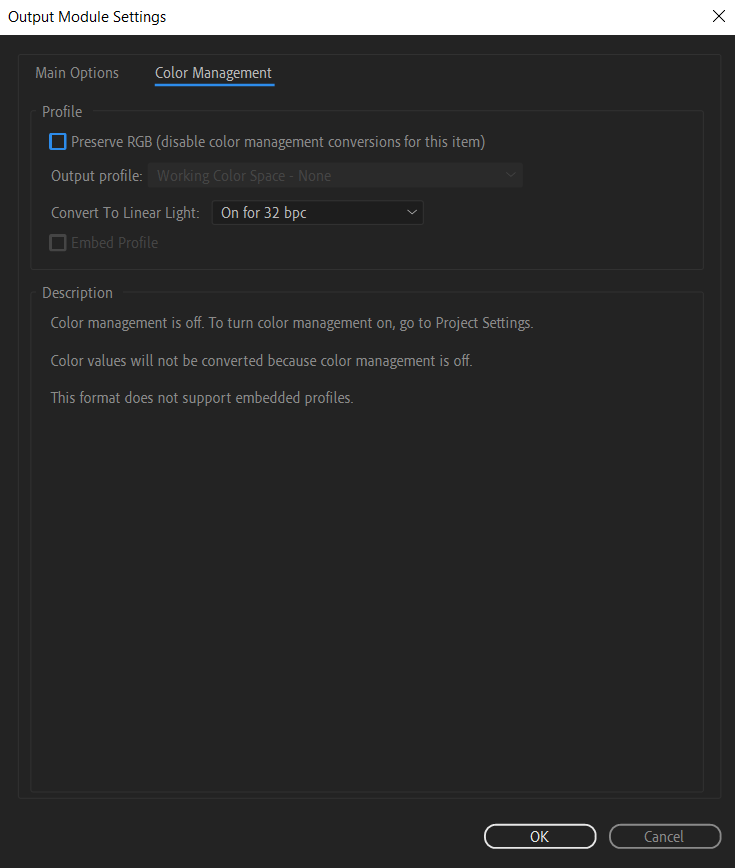
Get 10% off when you subscribe to our newsletter
7. Render Composition
Click on the “new.avi” option next to the Output To field and choose the path where you want to save your output. Opt for “Errors Only” from the Logs menu to identify any rendering issues. Check the box next to “New Comp” in the Render Queue tab, then click the “Render” button on the right side to initiate the rendering process. Observe as the composition begins rendering.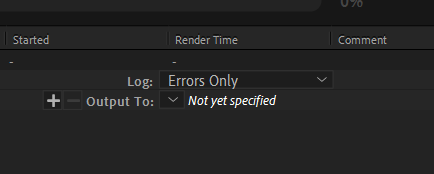


By following these expert tips and utilizing the features provided by After Effects, you can streamline your picture rendering process and achieve exceptional results. Remember, practice makes perfect, so don’t hesitate to experiment with different settings and techniques to find what works best for your unique projects. Happy rendering!
Get 10% off when you subscribe to our newsletter
Conclusion: Unleash Your Creative Vision with Picture Rendering in After Effects
Congratulations! You have completed this comprehensive guide on how to render pictures in After Effects. We’ve covered the essential steps, shared valuable tips and techniques, and highlighted the tools and features that will help you achieve stunning results.
Mastering After Effects rendering involves meticulous attention to composition and output module settings, judicious use of the Render Queue, and fine-tuning parameters like resolution, frame rate, and color management. These steps, combined with strategic adjustments in render and output settings, empower you to achieve outstanding results in your video projects.
Remember, the key to mastering picture rendering in After Effects is practice. Take the time to experiment with different settings, explore various effects and plugins, and push the boundaries of your creativity. With each project, you’ll gain more confidence and proficiency, eventually creating breathtaking visuals that captivate your audience.
Whether you’re a professional motion graphics artist, a filmmaker, or simply an enthusiast looking to enhance your visual content, After Effects provides immense power and flexibility for rendering pictures. Don’t be afraid to think outside the box and experiment with different styles and techniques. The possibilities are endless!
Now that you have the knowledge and tools at your disposal, it’s time to unleash your creative vision and create mesmerizing rendered pictures in After Effects. So, fire up the software, apply everything you’ve learned, and let your imagination run wild.
Keep exploring and pushing the boundaries of what’s possible in After Effects. And remember, the journey doesn’t end here – there is always more to learn and new techniques to discover. So, stay curious, stay inspired, and keep refining your skills.
Get 10% off when you subscribe to our newsletter
Thank you for joining us on this adventure into the world of picture rendering in After Effects. We hope this guide has empowered you to take your projects to new heights and create visuals that leave a lasting impression. Happy rendering!
Our Bestsellers


