Discover the secrets of manipulating time in After Effects with our step-by-step guide. Learn how to easily change the velocity, reverse footage, and create stunning time-lapse and slow-motion effects like a pro. Get ready to take your video editing skills to the next level!
Introduction: Unleashing the Power of Changing Time in After Effects
Have you ever watched a movie or a video that played with the concept of time? How breathtaking it is to witness a scene suddenly slowing down, speeding up, or even moving in reverse. Such time manipulation effects can add an entirely new dimension to your video projects, making them more engaging and visually captivating.
Get 10% off when you subscribe to our newsletter

If you’ve ever wondered how to achieve these mind-boggling effects, you’re in the right place. In this article, we’ll guide you through the process of changing time in After Effects, a powerful digital compositing software used widely across the film and motion graphics industry. Whether you’re a novice or an experienced motion designer, by the end of this guide, you’ll have the necessary knowledge and skills to master the art of altering time in your video projects.
Get 10% off when you subscribe to our newsletter

From altering the speed of your footage to creating mesmerizing time-lapse sequences and awe-inspiring slow-motion effects, After Effects provides an array of tools and techniques that can transform the way viewers perceive time in your videos. By leveraging these capabilities, you can elevate the storytelling in your projects, evoke emotions, and leave a lasting impression on your audience.
In this comprehensive guide, we’ll break down the various aspects of changing time in After Effects into easy-to-follow steps. We’ll explore techniques such as time-stretching, time-remapping, and time-reversal, uncovering the hidden tricks and tips along the way.
So, strap yourself in and get ready to embark on a thrilling journey through the realm of time manipulation in After Effects. Whether you’re aiming to create an adrenaline-pumping action sequence, a dreamy time-lapse, or a dramatic slow-motion shot, this guide will equip you with the necessary knowledge and tools to bring your visions to life.
Without further ado, let’s dive into the wonderful world of changing time in After Effects and unlock the secrets to captivating and mesmerizing videos that defy the laws of time.
Get 10% off when you subscribe to our newsletter

Changing Time in After Effects – Step-by-Step Guide
In this section, we’ll walk you through the step-by-step process of changing time in After Effects. From adjusting the speed of footage to creating time-lapse and slow-motion effects, here’s how to do it:
1. Altering Speed with Time Stretch:
– Select your video layer.
– Press “Ctrl+Shift+D” (Windows) or “Cmd+Shift+D” (Mac) to split the layer at the current playhead position.
Get 10% off when you subscribe to our newsletter

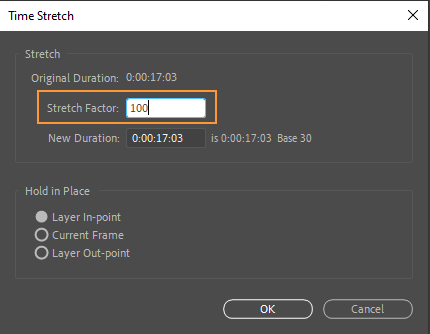
– Right-click on the newly created layer in the timeline, and select “Time” > “Time Stretch”.
– In the Time Stretch dialog box, adjust the “Stretch Factor” to accelerate or decelerate your footage’s speed.
2. Creating Time-Remapping Effects:
– Select your video layer.
– Press “Ctrl+Alt+T” (Windows) or “Cmd+Option+T” (Mac) to enable time-remapping for the layer.
– Open the layer’s properties by clicking on the triangle next to its name.
– Set keyframes at different points in time to control the speed variations within the footage. 3. Reversing Footage in Time:
– Select your video layer.
– Press “Ctrl+Alt+R” (Windows) or “Cmd+Option+R” (Mac) to enable time reversal for the layer.
– Your footage will now play in reverse.
Remember to experiment with different techniques and combinations to achieve the desired time effects. Try playing around with keyframes, easing functions, and layer blending modes to add more depth and creativity to your time-altering endeavors.
By mastering the art of changing time in After Effects, you’ll have the power to control and manipulate the passage of time in your visual storytelling. So, dive into this exciting realm and watch your videos transcend the boundaries of reality.
Conclusion:
Congratulations! You have successfully navigated the intricate world of changing time in After Effects. By following our step-by-step guide, you now possess the knowledge and tools to create captivating time-altering effects in your videos.
From adjusting the speed of footage and creating time-lapse sequences to reversing time and crafting slow-motion shots, After Effects empowers you to manipulate time in ways that can truly elevate the impact of your visual storytelling. By harnessing these techniques, you have the ability to captivate your audience, evoke emotions, and leave a lasting impression.
Remember that practice makes perfect. The more you experiment and explore the various time manipulation tools in After Effects, the more you will discover new and creative ways to incorporate time as a powerful storytelling element in your videos.
The key to mastering time manipulation lies in combining technical expertise with artistic vision. Understanding the hotkey shortcuts and techniques outlined in this guide is just the beginning. It is your ability to envision how and when to use these techniques that will set you apart as a skilled motion designer.
So, unleash your creative imagination, push the boundaries of what’s possible, and let time be your ally in creating visually stunning videos. With each new project, challenge yourself to experiment with different time effects and push the limits of your creativity.
Remember, changing time in After Effects is not just about manipulating numbers and frames; it’s about creating an experience, telling a story, and transporting your viewers into a whole new dimension.
Now, armed with this newfound knowledge, go forth and create remarkable videos that leave your audience in awe. Master time manipulation in After Effects, and let your creativity flourish like never before.


