How to render video in after effects

Rendering a video in Adobe After Effects is the final step in creating a project. Once you have completed working on your composition, you can then export it to a video file that can be shared with others or used in other video editing software. 

In this article, we will provide a detailed guide on how to render a video in After Effects.

Step-by-step tutorials on rendering video in After Effects

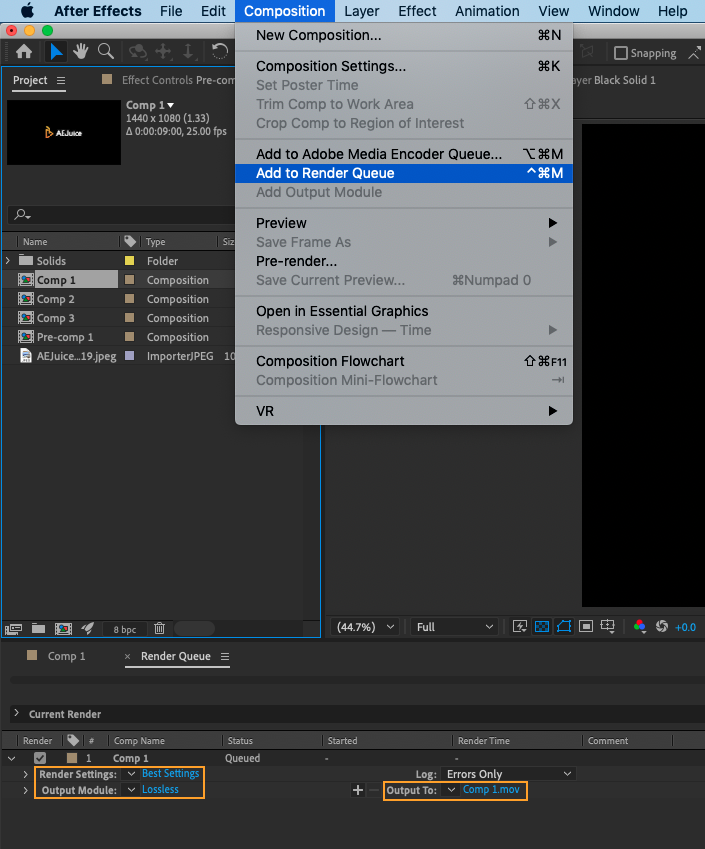
  1. Before you start rendering, make sure that your composition is fully complete and ready to be exported. This includes ensuring that all layers, animations, effects, and audio are finalized and that there are no errors or missing elements.
  2. Once your composition is ready, go to the Composition menu and select Add to Render Queue. This will open the Render Queue panel, where you can specify the settings for the output video.
  3. In the Output Module section of the Render Queue panel, click on the blue text next to Output To to select the location where you want to save the rendered video.
  4. In the Output Module settings, you can choose the format, resolution, frame rate, and duration of the output video. You can also decide whether or not to include audio in the rendering. Some popular video formats include QuickTime, AVI, and MP4.
  5. In addition to the basic rendering options, there are several other settings that you can adjust to customize the output video. Go to Composition > Composition settings…
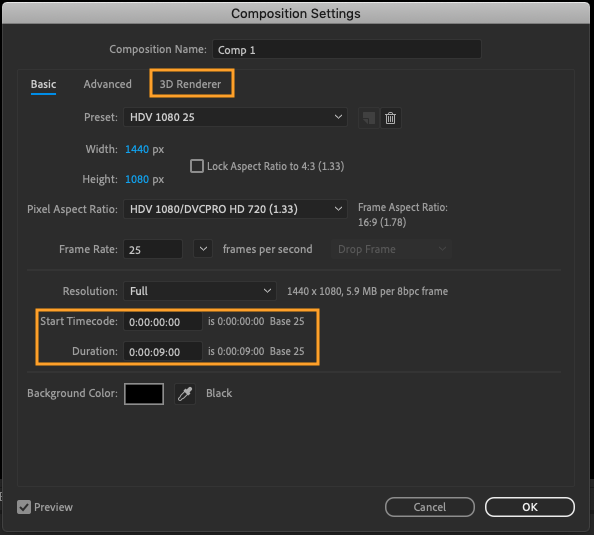
    For example, you can specify a particular rendering engine, such as the Ray-Traced 3D rendering engine, and you can choose to render only a portion of the composition by setting In and Out points.

  6. Once you have set your desired rendering options, click on the Render button in the Render Queue panel to begin the rendering process. Depending on the length and complexity of your composition, this may take some time to complete.
  7. When the rendering is finished, you can find the output video in the location that you specified in the Output Module settings. You can then share the video with others or use it in other video editing software.

In conclusion, rendering a video in Adobe After Effects is a straightforward process that allows you to share or use your work in other projects. By following the steps outlined in this guide, you can easily render a video in After Effects and take your projects to the next level.

-50%
-50%
00hrs : 00mins : 00sec
Happy HolidaysSale sitewide
Shop now

In addition to the basic rendering options that we have covered so far, there are several other advanced settings that you can adjust when rendering a video in After Effects. These settings can help you optimize the output video for different purposes and platforms, and can help you resolve any issues or problems that you may encounter during the rendering process.

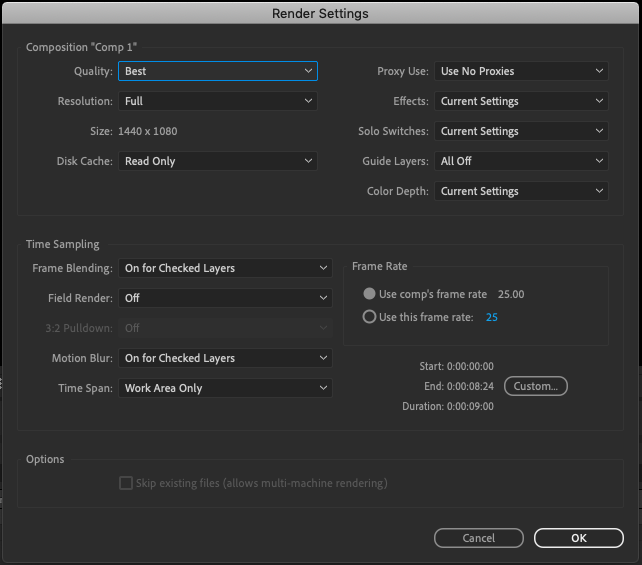
  1. Render Settings: In the Render Settings dialog box, you can choose the quality and performance options for the rendering process. You can choose to render at the maximum quality or at a lower quality to speed up the rendering process.
  2. Disk Cache Settings: In the Disk Cache settings, you can choose the location where After Effects stores the temporary files that are used during the rendering process. By default, After Effects uses the system drive, but you can choose to store the temporary files on a different drive to free up space on the system drive.

  3. Output Module Settings: In the Output Module settings, you can choose the video codec and the bit rate for the output video. Different codecs and bitrates are suitable for different purposes and platforms, such as YouTube or Vimeo.You can also choose to use a lossless codec to preserve the maximum quality of the output video.
  4. Audio Output Settings: In the Audio Output Settings dialog box, you can choose the sample rate and the bit depth for the audio in the output video. Higher sample rates and bit depths provide better audio quality, but they also increase the size of the output file.

By adjusting these advanced rendering settings, you can optimize the output video for different purposes and platforms, and you can troubleshoot any issues or problems that you may encounter during the rendering process. 


Keep in mind that these settings can be complex, and it is recommended that you consult the After Effects documentation or seek the advice of an expert if you are not familiar with them.


In conclusion, rendering a video in Adobe After Effects is a crucial step in the post-production process. 

By following the steps outlined in this guide, and by adjusting the advanced rendering settings as needed, you can easily render a video in After Effects and share your work with others.


-50%
-50%
00hrs : 00mins : 00sec
Happy HolidaysSale sitewide
Shop now

Get 5% off when you sign up

By subscribing you agree to your email being stored and used to receive the emails in accordance to our Privacy Policy
descount